


LOW AMBIENT CONTROL
All RV absorption refrigerators, while similar, operate a
little differently than your home refrigerator.
Dometic
designers and engineers have equipped your refrigera-
tor with an exclusive feature that allows for trouble-free
operation in low ambient temperature (like below 50°F)
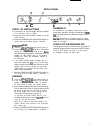
for extended periods of time. Simply press the LAC-but-
ton (5) on the display panel, the indicator lamp (G) will
illuminate (see FIG. 2 or display panel, section OPER-
ATING INSTRUCTIONS). Once the outdoor tempera-
ture is above 50°F. the low ambient switch should be
turned off.
ELECTRIC EQUIPMENT
CARTRIDGE HEATER
The heat necessary for the operation of an absorption
cooling unit is supplied by an electric heater mounted in
a pocket of the boiler system.
This model is equipped with
two
electrical heaters for
120 volt AC.
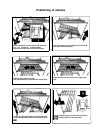
To replace the heater proceed as follows:
1.
Disconnect the wall plug, and the 12 volt wires.
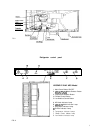
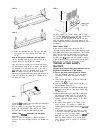
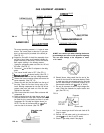
2. Remove the protection cover see FIG. 1
3. Remove the power module cover see FIG. 1
4. Disconnect the heater leads.
5. With a pair of pliers unfold the lug holding the lid
of the boiler casing and open the lid.
6. Remove some insulation wool so that the heater
is accessible.
7. Turn and lift the heater out of its pocket.
8. Fit the new heater into the pocket.
9. Connect the leads and put on the power module
cover.
10. Reset the insulation and close the lid of the boiler.
11. Replace the protection cover.
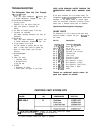
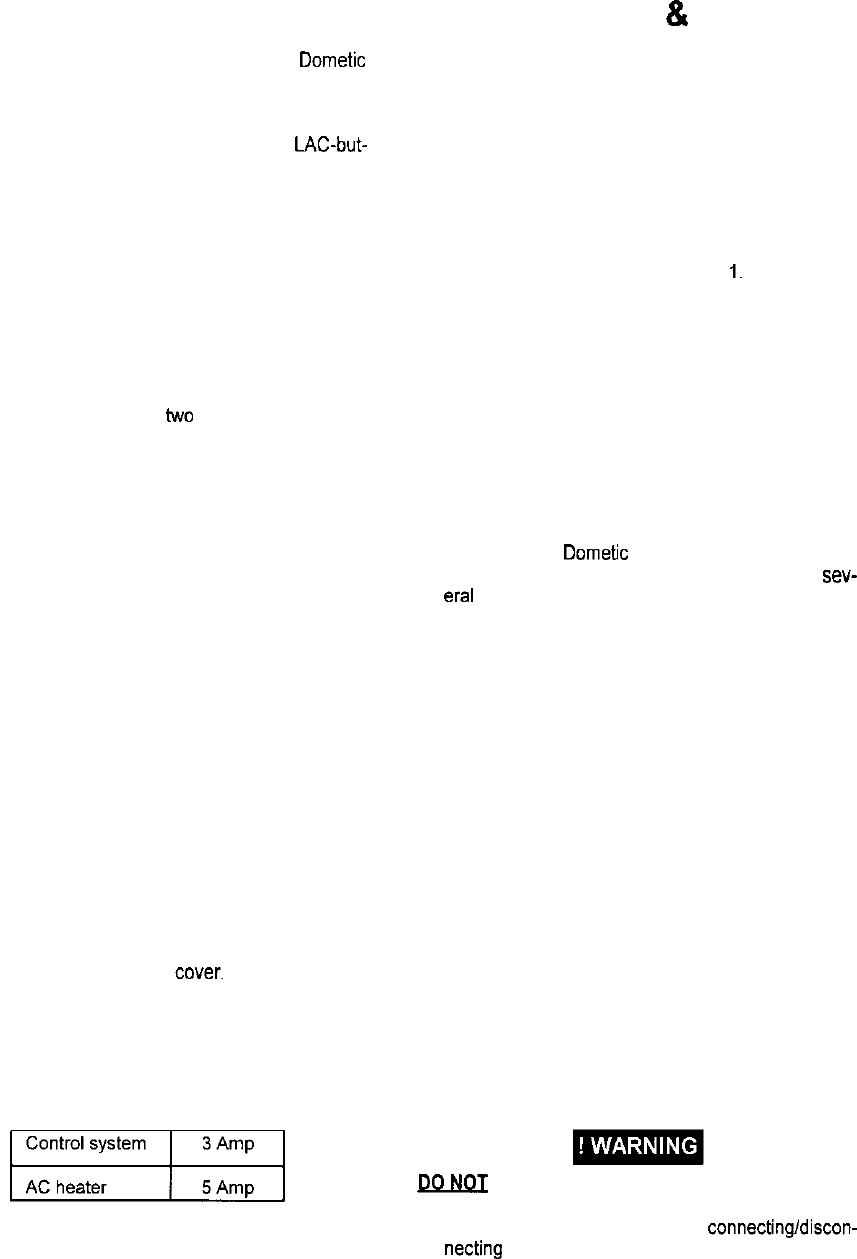
FUSES
This model is equipped with 2 fuses, one for the refrig-
erator control system and one for AC cartridge heater.
(See table below).
To replace fuses proceed as follows.
1.
Disconnect the wall plug, and the 12 volt wires.
2. Remove the power module
cover.
See FIG. 1.
3. Snap the fuse out of the fuse holder.
4. Fit a new fuse in to the fuse holder.
5. Replace the power module cover.
MAINTENANCE
8,
SERVICE
The user should be aware of service that must be
done on a regular schedule to keep the refrigerator
operating properly. The service should only be per-
formed by a qualified technician who is familiar with
LP gas systems and refrigerators.
1. REFRIGERATOR REMOVAL
Before working on the refrigerator, make sure the AC
voltage and DC voltage leads are disconnected. Shut
off the gas supply. Disconnect the gas supply line at
the rear of the refrigerator see FIG.
1.
Always use a
back up wrench when loosening and tightening this
connection. Cap the gas supply line loosen the
screws anchoring the refrigerator to the enclosure
and slide the refrigerator out of the compartment.
When replacing the refrigerator make sure that the
sealing strips are properly positioned.
Replacement is the reverse of removal. Check all
connections for gas leaks.
Refer to section INSTALLATION, page 4 to 8.
2. PERIODIC MAINTENANCE
A
To keep your Dometic refrigerator operating efficiently
and safely, periodic inspection and cleaning of sew
era1
components once or twice a year is recom-
mended.
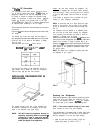
It is important to keep the area at the back of the
refrigerator clean. Check the lower vent, upper vent
and area between these openings for any obstruc-
tions such as bird/insect nests, spider webs, etc.
Clean the coils on the back of the refrigerator. Use
a soft bristled brush to dust off the coils.
It is important to keep the refrigerator area free from
combustible material, gasoline and other flammable
vapors or liquids.
NOTE: The following maintenance is required once or
twice a year. but should only be done by a qualified ser-
viceman who is familiar with LP gas systems and refrig-
erators.
B. Check all connections in the LP gas system (at the
back of the refrigerator) for gas leaks. The LP gas
supply must be turned on. Apply a non-corrosive
bubble solution to all LP gas connections. The ap-
pearance of bubbles indicates a leak and should be
repaired immediately by a QUALIFIED SERVICE-
MAN WHO IS FAMILIAR WITH GAS SYSTEM AND
REFRIGERATORS.
DQNQI
use a flame to check for gas leaks.
C. Check the AES control system by connecting/discon-
netting
120 volt AC power. start/stop the engine, etc.
Compare the operation with the operation described
in description of operating modes. Page 10.
D. The LP gas pressure should be checked and the main
regulator re-adjusted if pressure is incorrect.
12