4.
5.
6.
7.
8.
9.
10.
11.
12.
13.
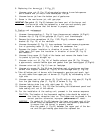
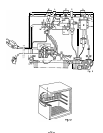
Pull off thermostat knob (C,
Fig.11)
and
knob
(D,
Fig.11)
of safety device
(E, Fig. 11).
Unscrew union nut (F,
Fig.11)
of gas-pipe (G,
Fig.11)
from flame failure
safety device (E, Fig. 11).
Remove three cable plug-connections from thermostat (H,
Fig.11).
Unscrew thermo-coupling (I,
Fig.11)
from thermo-current adapter (J,
Fig.11).
Unscrew thermostat (H,
Fig.11)
from support bracket (K,
Fig.11)
( 2 screws
).
Unscrew two clips (L,
Fig.11)
from capillary tube (M,
Fig.11).
Remove gas-equipment from cabinet and dismantle.
Dismantling of thermostat (H,
Fig.11)
:
Unscrew flame failure safety device
(E,
Fig.11)
with thermo-current adapter (J,
Fig.11)
and the connection
(N,
Fig.11)
from thermostat.
Dismantling of the flame failure safety device (E,
Fig.11)
:
Unscrew flame
failure safety device from thermostat (H,
Fig.11).
Then unscrew
thermo-
current adapter (J,
Fig.11)
from the flame failure safety device.
For reassembly, proceed in the reverse sequence of dismantling.
CAUTION:
Coat threaded unions at the connection/thermostat and thermostat/flame
failure safety device with Loctite 572 to ensure good sealing.
Be careful not to get any Loctite inside any parts.
5.
Replacing
the thexmo-current adapter
(J,Fig.
_____ _____ ____
11).
____
1.
Unscrew thermo-coupling (I,
Fig.11)
from thermo-current adapter.
2.
Unscrew thermo-current adapter from flame failure safety device (E,
Fig.11)
and replace by new unit.
6. Replacing the thermocouple
(I,
Fig.
11)
_____ _____ ___
1.
Unscrew thermo-coupling from thermo-current adapter (J, Fig. 11).
2.
Unscrew clip (0,
Fig.11)
for gas-pipe (G,
Fig.11)
and thermocouple.
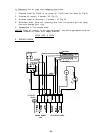
3. Unscrew the three screws of the mounting plate (A,
Fig.12)
from the bottom
part of gas-burner.
Take off spark ignitor (B,
Fig.12),
mounting plate with
thermocouple (I,
Fig.12)
and gasket (C,
Fig.12).
4.
Unscrew lock-nut (D,
Fig.12)
of the thermocouple
5.
Bend new thermocoupling (I, Fig.
11+12)
to shape of old one. For reassemhly,
proceed in the reverse sequence of dismantling.
IMPORTANT:
The gasket (C,
Fig.12)
between the lower part of the burner and the
mounting plate must be replaced by a new one and carefully positioned
to ensure that the burner is properly sealed.
7. Replacement of spark
ignitor
with cable
(B,Fig. 12)
1.
Remove ignition cable (P,
Fig.11)
from piezo
ignitor
(Q,
Fig.11).
2.
Unscrew the one screw (A3,
Fig.12)
from the spark ignitor, withdraw spark
ignitor and replace it by a new one.
Reassemble in the reverse order.
-7-


