


SPECIAL HINTS
Note. Do not install the appliance directly on carpeting.
Carpeting must be protected by a metal or wood panel
beneath the appliance which extends at least full width and
depth of the appliance.
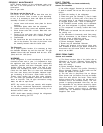
The refngerator must be installed
in
a substantial enclosure and
must be level. A spirit level is supplied
with
each refrigerator and
by
placing
it
in
the freezer compartment one can level the
refrigerator both ways front to back and side to side. When
installing the refrigerator in the enclosure care should be taken to
ensure a complete sealing between the front frame of the
refrigerator and the top,
sides
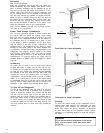
and bottom of the enclosure. For
this purpose a length of sealing
strip
is applied to rear surfaces of
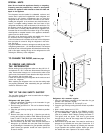
the front frame. A sealing strip should also be applied to the
foremost floor of the enclosure as shown in fig 8. The sealing
should provide a complete isolation of the appliance combustion
system from the vehicle interior.
Be careful not to damage the sealing strip applied to the floor of
the enclosure when the refrigerator is put in place.
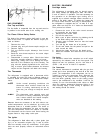
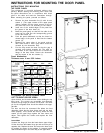
In the front frame and
in
the base at the rear of the refrigerator
there are holes for screws for fixing the refrigerator in the enclo-
sure. See fig. 9.
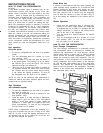
Any space between counter or storage area and the top of the
refrigerator greater than 1 1/2” should be blocked. The heat pro-
duced at the rear of the refrigerator will otherwise become trap-
ped in this space making the top of the refrigerator hot and
reducing the efficiency of the refrigerator.
TO CHANGE THE DOOR, see last page
TO REMOVE AND REPLACE
THE REFRIGERATOR
Before working on the refrigerator make sure that 120 V A. C.
and optional 12 V D.C. Leads are disconnected. Shut the gas
valve. Unscrew the hexagon nut 11 and move the valve on the
gas line out of the bracket. Check that the valve slips out of the
clip connection with the switch shaft.
Loosen the screws fixing the refrigerator to the enclosure and
remove the refrigerator.
When replacing the refrigerator make sure that the sealing strips
are properly positioned. After reassembly the gas connection
should be checked for leaks.
TEST OF THE GAS SAFETY SHUTOFF
The gas safety shutoff device must be tested after the refrigera-
tor is placed in operation.
Refrigerator with piezo ignitor.
1.
2.
3.
4.
5.
6.
Start the refrigerator according to the instruction for gas
operation
with
piezo igniter.
Check that the gas flame is lit. This can be observed through
the reflector E.
Close the gas valve by turning the knob A back to position
“OFF”.
Wait 1 minute.
Remove cover plate, see (46) in fig.
1,
Open the gas valve by
turning the knob A to position “GAS” whithout pushing the
button C and D. Test that no gas comes through the jet, item
38. Use soapy water. Be careful not to damage the jet.
After test rinse the
jet
with
water. Once more be careful not to
damage the
jet.
Assamble the cover plate. Start the refrigera-
tor by following the Instruction for gas operation with piezo
igniter. Normal gas operation should now return. Operate for
at least 5 minutes.
[‘
1
L-
1
c
!
/
/
Fig.8
7
-_
-.
<
Fig.9
Refrigerator with automatic reigniter.
1.
2.
3.
4.
5.
6.
Start
the refrigerator according to the instruction for gas
operation with automatic reigniter.
Check that the gas flame is lit. The lamp E is out.
Close the gas valve by turning the knob A back to position
“OFF”.
Wait 1 minute, disconnect 12 V D.C.
Remove cover plate, see (46) fig. 2 for RM2501 and (55)
fig. 3 for RM
2601/2801.
Open the gas valve by turning
knob A to position “GAS” without pushing the button C.
The igniter shall not spark. Test that no gas comes
through the jet, item 38. Use soapy water. Be careful not
to damage the jet.
After test rinse the jet with water. Once more be careful not to
damage the jet. Assamble the cover plate. Connect the 12 V
D. C. again. Start the refrigerator by following the instruction
for gas operation with automatic reigniter. Normal gas opera-
tion should now return. Operate for at least 5 minutes.