17
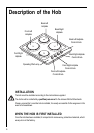
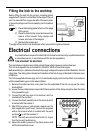
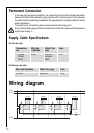
Fitting the hob to the worktop
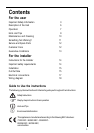
Before fitting the hob into the cut out, a sealing gasket
supplied with the hob must be fitted to the edge of the cut
out. It is essential that no gaps are left in this seal in order
to prevent spillage near the hob seeping into the cabinet
below.
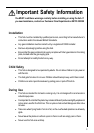
1) Place the sealing gasket all around the edge
of the cut out.
2) Place the hob into the cut out and secure it by
means of the relevant fixing clamps and
screws, as shown in the diagram.
3) Remove the excess seal
The edge of the hob forms a double seal which prevents the ingress of liquids.
))
))
)
Electrical connections
Any electrical work required to install this hob should be carried out by a qualified electrician
or competent person, in accordance with the current regulations.
THIS HOB MUST BE EARTHED.
The manufacturer declines any liability should these safety measures not be observed.
This hob is designed to be connected to a 230-240V 50Hz AC electrical supply.
Before switching on, make sure the electricity supply voltage is the same as that indicated on the hob
rating plate. The rating plate is located on the bottom of the hob. A copy is attached on the back cover
of this book.
The hob is supplied without supply cord. A 3 core flexible supply cord must be fitted, in accordance
with the specification given in the relevant tables.
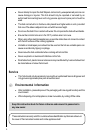
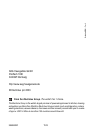
1) Remove the mains terminal cover plate from the underside of the hob, to expose the mains
terminal block.
2) Loosen the two cable clamp screws and lift the top section of the clamp enough to allow the cable
to be passed through.
3) Connect the red (live) wire to the terminal which is
marked with the number 1.
4) Connect the black (neutral) wire to the terminal which
is marked with the number 4.
5) After fitting a green or yellow/green sleeve over the
bare copper wire (earth wire), connect the exposed
end to the terminal which is marked with the earth
symbol or with the number 5.
NOTE: The earth wire should be about 2 cm. longer
than the live and neutral wires.
6) Secure the cable by means of the clamp screws and
refit the terminal block cover.
FO 0488
FO 0199
a
Seal