


electrolux electrolux
electrolux electrolux
electrolux installation
2323
2323
23
GB
InstallationInstallation
InstallationInstallation
Installation
Make surMake sur
Make surMake sur
Make sur
e that the cooker hood is disconnected fre that the cooker hood is disconnected fr
e that the cooker hood is disconnected fre that the cooker hood is disconnected fr
e that the cooker hood is disconnected fr
om the power supply beforom the power supply befor
om the power supply beforom the power supply befor
om the power supply befor
ee
ee
e
carrying out the installation.carrying out the installation.
carrying out the installation.carrying out the installation.
carrying out the installation.
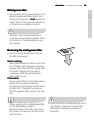
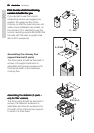
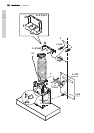
Remove the perimeter air suction panels (EFC 9673 only) and the grease filters.
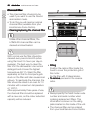
• Mark a central line on the wall to facilitate the installation procedure (
11
11
1). Position
the drilling template so that the median line printed on it corresponds to the
central line marked previously, and so that the lower side of the template
corresponds to the lower part of the cooker hood once it has been fitted (
22
22
2).
• Make 3 holes with Ø 8 mm (2 on top and 1 underneath) and fit 3 rawl plugs into
them (
33
33
3).
• Fix the motor assembly support bracket in place using 2 screws (
44
44
4).
• Make two holes with Ø 8 mm near the ceiling and use them to fix the support
bracket of flue
GG
GG
G in place (use the bracket as a template – rest it against the wall
which joins onto the ceiling). Insert 2 rawl plugs into the holes (
55
55
5) (install deflector
FF
FF
F underneath the bracket using 4 screws if you wish to use the cooker hood as
a filter version) and fix the bracket in place using 2 screws (
66
66
6).
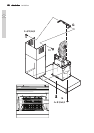
• Fit the cooker hood (
77
77
7) and adjust its position (
8-98-9
8-98-9
8-9).
• Fix the cooker hood in place (
1010
1010
10).
• Install the exhaust tube (
1111
1111
11) leading from cooker hood exhaust outlet
BB
BB
B to the
outside environment (ducted version) or deflector
FF
FF
F (filter version).
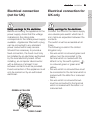
• Perform all necessary electrical connections (
1212
1212
12).