


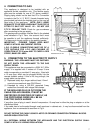


If the wiring is extended or a completely new cable fitted a 3-pin 13 amp plug should be fitted. (See Fig.4a).
Connect the wires as follows:
BROWN to the Live Terminal.
BLUE to the Neutral Terminal.
GREEN and YELLOW to the Earth Terminal.
As the colours of the wires in the mains lead which you
fit may not correspond with the coloured markings
identifying the terminals in your plug, proceed as follows:
The wire which is GREEN and YELLOW must be
connected to the terminal in the plug which is marked
with the letter 'E' or by the earth symbol or coloured
GREEN or GREEN and YELLOW.
The wire which is coloured BLUE must be connected to
the terminal which is marked with the letter 'N' or
coloured BLACK.
The wire which is coloured BROWN must be connected
to the terminal which is marked with the letter 'L' or
coloured RED.
FIT A 13 AMP FUSE TO THE PLUG HOLDER.
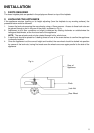
Ensure that the supply cable cannot get caught by the stability bracket. Plug in the appliance.
6. PRESSURE TESTING
1 The hotplate rapid burner injector is used as a pressure test point.
2 Lift the lid and connect the pressure gauge to the rapid burner injector.
3 Check the supply pressure by turning rapid burner tap on full and one other hotplate tap full on and
light the appropriate burner. The pressure must be set to 28mbar for use on butane or 37mbar for use
on propane.
4. Turn off the taps and disconnect the pressure gauge.
7. CHECKING THE GRILL
Place the grill pan containing the trivet into the grill compartment. To light the grill burner , turn the grill tap
to its full on position, then press the ignition button until the burner is lit.
8. CHECKING THE HOTPLATE
Lift the lid. Fit the burner crowns and caps ensuring that they are correctly seated. Fit the pan supports.
Check each of the hotplate burners in turn by turning the hotplate tap to it's full on position then pressing
the ignition button until the burners are lit.
9. CHECKING LID SHUT-OFF DEVICE
1. Lift the lid.
2. Turn one hotplate burner tap to its full on position, then push and release the ignition button.
3. Close lid. There should now be no gas supply to the hotplate and the burner will go out.
4. Turn off the hotplate tap and lift the lid. The gas supply should now be restored to the hotplate, when
the tap is turned on.
8
Fig.4a
BROWN
13 AMP
GREEN AND
YELLOW
BLUE