


Ice & Water
Filter
continued
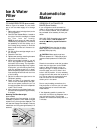
TO CHANGE FRONT FILTER: (some models)
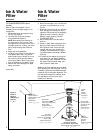
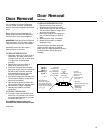
Refer to Figure 4 as needed. It is not neces-
sary to turn the water supply off to change
filter.
1. Set ice maker lever (wire signal arm) to the
OFF (up) position.
2. Push the Filter Release Button, located to
the right of the filtre cartridge, to release
the filter from the housing.
NOTE: A small amount of water may be
releasedduring this operation. To minimize
the possibility of the filter falling out of
the housing during removal, it would be
best to hold the filter as it moves out to-
ward you.
3. Pull the old filter cartridge straight out of
the housing.
4. Discard the old filter.
5. Replace new cartridge, installing the same
way as the old one came out.
6. When the cartridge is almost in, you will
feel it stop against the clip assembly in
the back of the housing. The clip assem-
bly holds the filter cartridge firmly in place.
At this point, you will need to push firmly
until the cartridge snaps fully in place.
When completely in place, the front of the
filter cartridge will be flush with the front
of the housing.
7. Set the ice maker wire signal arm to the
ON (down) position.
8. Check for leaks. Fill a glass with water.
There will be noticable spurts and sput-
ters as the system pushes the air out
through the system and out the dispenser
nozzle. This is normal.
9. After you have run one glass of water, con-
tinue to flush the system for approximately
3 minutes.
Resetting The Filter Status Light
(some models)
After replacing the filter cartridge, it will be
necessary to press the Filter Reset touchpad
located on the ice and water dispenser. This
will reset the Change Filter Indicator. Push the
reset button until the green light flashes (3-15
seconds).
Filter
Cartridge
Push Button
To Release
Push In
and Click
To Install
Figure
4
Automatic Ice
Maker
OPERATION OF AUTOMATIC ICE
MAKER (Some Models)
If your refrigerator has an automatic ice
maker, it will provide a continuous supply of
ice. If not factory installed, the ice maker can
be purchased as an accessory kit from your
dealer.
220-240V, 50/60 Hz models use ice maker
kit number
IM220. This ice maker kit
must be installed by a qualified techni-
cian only.
CAUTION: Ensure that the ice maker
water supply tube is connected to a safe
(potable) water pipe only.
CAUTION: Water supply must have
minimum pressure of 1.4 bars (20 psi) and
maximum water pressure of 6.9 bars (100
psi).
Place the ice container under the ice maker.
Lower the wire signal arm to the DOWN
position. When the freezer is cold, ice
making will begin. To stop ice maker, lift
the wire signal arm until it clicks in and
locks in the UP position. It is not necessary
to stop the ice maker when the ice server is
full. The ice maker will automatically shut
itself off when the ice level reaches a
certain point in the server.
Due to new plumbing connections, the
first production of ice from your ice maker
may be discolored or have an odd taste.
Please discard.
If the dispensing paddle is pushed for
more than 4 minutes, the dispenser motor
may overload and stop. The overload
protector will reset automatically after 3 or
4 minutes.
9