


- 13 -
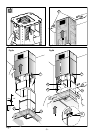
that are not completely tightened.Rotate slightly to fit (fig.4). Drive in the fourth
screw X and tighten the remaining 3 to allow definitive blocking of the upper part of
structure B
- Take the lower part of the telescopic structure C and insert it into the upper struc-
ture B (fig.5).
Adjust the height by referring to the amounts indicated in (fig.14) and block it using
the 8 screws G that are supplied (fig.6).
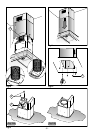
- Fix the flexible pipe to the prepared air evacuation hole (fig 7).
- In the case that your hoods is indicated on the fig. 13a mount the connecting flange
F in the upper part of the hood’s suction unit using the 2 screws E.
- Take the upper chimney piece and fix it to the structure using the 2 screws A
(Fig.8). Join the lower chimney piece with the upper one and fix it carefully using
adhesive tape L (Fig.9a).
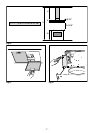
- Unscrew the 2 screws O, max 3 mm (Fig.9a). Insert the suction unit inside the
structure paying attention that the previously unscrewed screws O, hook into the
slots in the lower part as indicated in (Fig.9b). Drive in the 3 screws N (supplied)
and tighten the 2 screws O (Fig.9b).
- Fix the air evacuation pipe H (not supplied) onto the connection flange F (Fig.10)
- Remove adhesive tape L and rest the lower chimney piece above the cooker hood
(Fig.11).
-If the cooker hood is supplied with a lower chimney piece that must be fixed to the
hood body with screws, remove the anti-grease filters from the hood by acting on the
relevant handles (Fig.15). Then screw the lower chimney piece pipe to the inside of
the hood, using screws P (Fig.14). Re-locate the filters in their seat.
USE
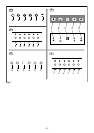
• If the apparatus is equipped with the following controls (fig.17A):
A = OFF
B = SPEED I
C = SPEED II
D = SPEED III
E = LIGHT
• If the apparatus is equipped with the following controls (fig.17B):
A = LIGHT
B = OFF/SPEED I
C = SPEED II
D = SPEED III
E = AUTOMATIC STOP TIMER – 15 minutes
F = FILTER SATURATION RESET LIGHT
When the “filter saturation” light flashes or comes on without flashing, the anti-grease filters
must be washed. When this operation has been completed, press the key (F) to reset it.
The “automatic stop timer” delays stopping of the hood, which will continue functioning for
15 minutes at the operating speed set at the time this function is activated.
• If the apparatus is equipped with the following controls (fig.17C):
A = LIGHT