GETTING TO KNOW YOUR QUAD BLADE FOOD
PROCESSING CENTER
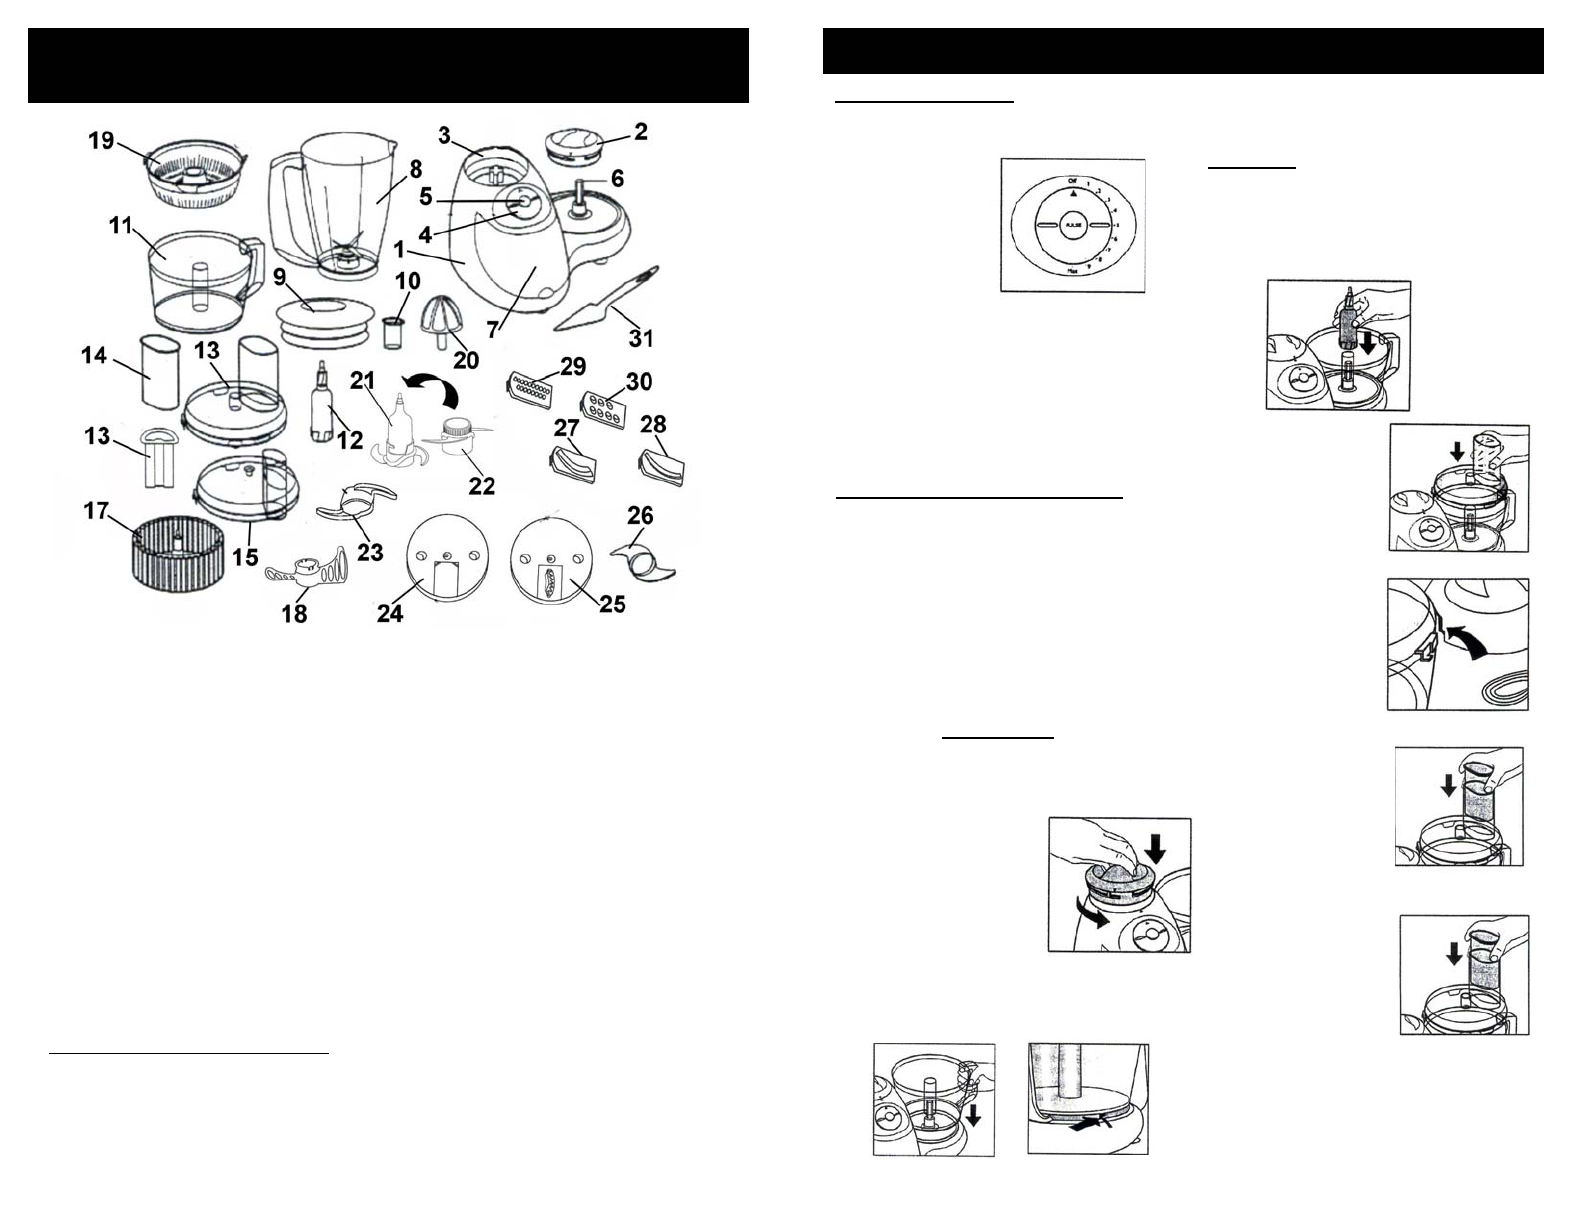
1. Processor Body
2. Safety Cover
3. Safety Cover/Blender Location
4. On/Off Speed Control Dial
5. Turbo/Pulse Button
6. Drive Shaft
7. Storage Compartment
8. Blender Jar
9. Blender Lid
10. Measuring Cap
11. Processor Bowl
12. Spindle
13. Processor Lid
14. Food Pusher
15. Juice Extractor Lid
16. Juice Extractor Pusher
17. Juice Extractor Filter
18. Whipping Attachment
19. Citrus Juicer Filter
20. Juice Reamer
21. Main Chopping Blade
22. Double Chopping Blade
23. Chopping Blade Protective Cover
24. Blade Holder
25. French Fry Disk Assembly
26. Dough Blade
27. Thick Slicing Blade
28. Thin Slicing Blade
29. Fine Chopping Blade
30. Coarse Chopping Blade
31. Spatula
Technical Specifications
Voltage: 120V., 60Hz.
Power: 800 Watts
Food Processor Capacity: 6 Cups (1.5 Liters)
Blender Capacity: 7 Cups (1.75 Liters)
3
4
OPERATING INSTRUCTIONS
Operating the Food Processor
Setting up:
1. CAUTION: Make sure that the unit is
unplugged from the power source and
the the Speed control dial is in the
"Off" position before inserting or
removing any attachments and before
cleaning.
2. Fit the safety cover into the food
processor body and turn
counterclockwise firmly until it “clicks”
into place (the arrows will now be
lined up). IMPORTANT
THE FOOD
PROCESSOR WILL NOT OPERATE
WITHOUT THE SAFETY COVER IN
PLACE.
3. Place the food processor bowl onto
the processor body.
There is no need
to turn the bowl.
(Fig. 2)
4. When fitted correctly,
the handle will be
to the right of the
assembly, and the
ridge on the base
of the bowl will fit into the slot at the
back of the processor body.
(Fig. 3 & Fig. 4)
Fig. 1
Fig. 2
Fig. 3 Fig. 4
5. Fit the spindle onto the motor shaft
and the appropriate attachments
onto the spindle. (Fig. 5)
WARNING
TO REDUCE THE RISK OF
INJURY, NEVER PLACE THE
CUTTING BLADE ON THE BASE
WITHOUT FIRST PUTTING THE
BOWL PROPERLY IN PLACE.
WARNING: Always remove the
blender and fit the safety cover into
the processor body when using the
processor.
For safety, always
use the food
pusher when
putting food into
the feeder tube.
Never feed by
hand. (Fig. 9)
Fig. 5
6. Holding the
processor lid
by the feed tube,
fit the lid by
rotating
counterclockwise.
(Fig. 6)
Fig. 6
7. Ensure that the lid
tab has “clicked”
into place and the
arrows are lined
up. (Fig. 8)
Fig. 7
8. Plug the processor
and switch on.
If the processor
does not come on,
check that the
machine cover and
processor lid are
both correctly fitted.
(Fig. 8)
Fig8
Fig9
Speed Control Dial
The food processor and blender
speed control dial has speeds settings
as follows: (Fig. 1)
Off/1-9 + Max
Pulse/Turbo
The speed can be
adjusted while the
food processor is
in use.
Use of the Pulse/Turbo button allows
greater control over the texture of the
food being processed. Use "Pulse"
when the unit is in the "Off" position.
Use "Turbo" when the unit is in the
"On" position and you need a burst of
power. Please note that the "Pulse"
and "Turbo" is only intended to be
used for short "bursts" of processing.
