


OPERATING INSTRUCTIONS
Citrus Juice Filter
CAUTION: Make sure that the unit is
unplugged from the power source and
the speed control dial is in the “OFF”
position before inserting or removing
attachments.
WARNING: Always Operate The Juicer At
Lowest Speed Only. Do Not Operate The
Citrus Juicer At Higher Speeds.
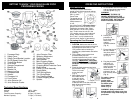
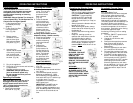
1. Fit the processor bowl
as detailed previously
(page 4).
2. Fit the citrus juice filter
into the processor
bowl. (Fig. 26)
Fig. 26
9
3. Rotate counter
clockwise. Ensure
that the citrus juice
filter tab has clicked
into place. (Fig. 27)
4. Insert the juice
reamer into the center
of the citrus juice filter
with its shaft inside
the central column of
the bowl. (Fig. 28)
5. Plug in the appliance.
6. Place fruit on juice reamer and hold with
a cupped hand.
7. Operate at minimum speed.
WARNING: Always operate the
juicer at minimum speed only.
Do not operate the citrus juicer at
higher speeds.
Fig. 27
Fig. 28
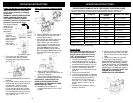
Operating the Blender (Cont.)
2. Remove the safety
cover. This can only
be done once the
processor lid has
been removed.
(Fig. 30)
3. Place the blender
into its location on
the processor body
with the handle to the
left. Turn counter
clockwise until the
blender clicks into
place and the arrows
are aligned. (Fig. 31)
Warning: Use extreme caution -
blades are sharp. Handle carefully.
4. Place food in blender.
5. Place the blender lid
and the measuring
cap on the blender.
(Fig. 32)
6. Replace the
processor bowl
and processor lid.
Ensure that the lid
tab has clicked into
place. The blender
will not operate if
the processor lid is
not clicked in place.
Make sure that
NO ATTACHMENTS
are inside the food processor bowl
when you are using the blender.
(Fig. 33)
7. Plug in the processor.
8. Always operate the blender with the
lid in place.
9. Recommended speed levels for
blending are between 5 - MAX.
When blending soft vegetables or
fruits start with level "5" and then go
to a higher level. For hard
vegetables or fruit always use "
MAX" speed level.
IMPORTANT: Do NOT load the
blender with more than 10 oz.
(300 gr.) of hard vegetables at one
time. Do NOT operate continuously
for more than 20 seconds at one
time.
Operating the Blender
CAUTION: Make sure that the unit is
unplugged from the power source
and the speed control dial is in the
“OFF” position before inserting or
removing attachments.
1. Remove the processor
bowl and lid. (Fig. 29)
Fig. 29
Fig. 30
Fig. 31
Fig. 32
Fig. 33
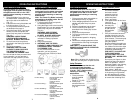
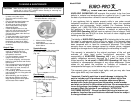
NOTE:
TO REMOVE THE
BLENDER, YOU MUST
FIRST UNLOCK AND
REMOVE THE
PROCESSOR LID (A).
THEN UNLOCK AND
REMOVE THE BLENDER (B)
BY TWISTING CLOCKWISE.
(Fig. 34)
WARNING:
ALWAYS REMOVE THE
BLENDER AND FIT THE
SAFETY COVER INTO THE
PROCESSOR BODY WHEN
USING THE PROCESSOR.
(Fig. 35 & 36)
Operating the Blender (Cont.)
NOTE: You can crush 16 oz.
(500 ml) of ice cubes in the blender
using the PULSE/TURBO button.
CAUTION: To prevent spilling
(overflow) do NOT operate the
blender with more than 4 cups
(1000 ml) of soft liquid (i.e. soup) at
one time.
* Always operate the blender with the
blender lid in place.
* When blending hot liquids, always
remove the small measuring cap in
the blender lid.
* Avoid contact with moving parts at
all times.
* Keep hair, clothing as well as
spatulas and other kitchen utensils
out of the blender jar while in
operation to reduce the risk of
severe injury to persons or damage
to the blender. A spatula may be
used but ONLY
when the unit is not
in use.
OPERATING INSTRUCTIONS
Fig. 34
Fig. 35
Fig. 36
Re-settable Thermal Safety
Device
Your Quad Blade Food
Processor/Blender has been designed
with a unique safety system which
prevents damage to the unit’s motor
and drive system, should you
inadvertently overload your appliance.
The safety system will automatically cut
the electric power to the appliance
when the device senses an overload or
excessive temperature in the motor or
drive system. Should this occur during
use and the appliance stops
functioning, following is the re-setting
procedure:
1. Turn the “ON/OFF” speed control
to the “OFF” position
2. Unplug the unit from the wall
receptacle.
3. Remove and empty the processor
bowl. Ensure that no food is
jamming the cutting blades or
attachments.
4. Allow the appliance to cool down
for a minimum of 30 minutes.
5. Re-install the processor bowl and
re-plug appliance in the wall outlet.
6. Proceed to use the appliance as
before. Should the appliance still
fail to operate, turn the “ON/OFF”
speed control to the “OFF” position
and unplug from the wall outlet.
Allow the appliance to cool down
for an additional 1 to 2 hours. After
this time has passed, repeat the
restart procedure, steps 5 and 6
above.
10