


9
Operating Instructions
DEHYDRATE
Note: It is not recommended to pre-
heat the oven when using this function.
PIZZA FUNCTION
For efficient use of the dehydrate
feature:
• Food should be placed in a single
layer on a wire mesh rack suitable
for dehydrating. (Not supplied) Do
not use cookie sheets, as the air
needs to circulate around the food.
• Once the drying process begins, it
is not recommended to stop the
process. Do not let your vegetables
/fruit cool again until process is
complete.
• Dehydrate food in small quantities
only.
Bake your favorite pizza, or pizza
pockets, etc. The bake ware that will fit
in your oven is up to 12 inches in
diameter. Never
use plastic cardboard,
paper or anything similar in the oven.
Operation
Note: The temperature setting is not
adjustable on this function.
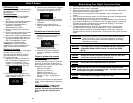
1. Connect unit to power supply.
2. Place wire rack on desired support
guide.
3. Press the “Pizza” button to select the
pizza function.
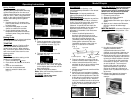
4. Set the time by pressing the “Increase
/Decrease” button. We recommend
that you set the time according to
package instructions. (Fig. 14)
Note: There is no need to press the
“Timer/Temp” button when using this
feature to adjust the time desired.
WARNING: Be sure to unplug the
oven and allow it to cool before
cleaning.
5. Open the door and place the pizza in
the oven, then close the door.
6. Press the “Start” button.
7. When the pizza is done, the unit will
beep continuously for one (1) minute
and “END” will appear in the display
panel until the stop button is pressed.
8. Press the “Stop/Cancel” button.
Fig. 14
• Dehydrating food should be done
slowly to remove moisture from
food.
• Do not mix strong flavored items
together, as the flavors can transfer
from one vegetable/fruit to the next.
• Fruits and vegetables that could
brown should be pretreated by
dipping into a solution of 3 tbsp of
lemon juice and 1 quart (1 liter) of
water. Dip fruit or vegetables in the
solution for 30-60 seconds before
dehydrating.
• After process is complete, store the
food in air tight containers to
preserve their freshness.
Operation
Note: The temperature setting on this
function cannot be adjusted.
1. Connect unit to power supply.
2. Place wire rack on desired support
guide, then place dehydrating rack
with food onto wire rack.
3. Press the “Dehydrate” button to
select the dehydrate function.
4. Set the timer by pressing the
“Increase/Decrease” button.
5. Open the door and place the food in
the oven, then close the door.
6. Press the “Start” button.
7. When the food is done, the unit will
beep continuously and “END” will
appear in the display panel.
8. Press the “Stop/Cancel” button.
Note: There is no need to press the
“Timer/Temp” button when using this
feature to adjust the time desired.
WARNING: Be sure to unplug the
oven allow it to cool before cleaning.
28
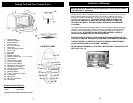
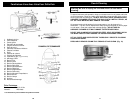
Utilisation de Votre Four Grille-Pain
Veuillez vous familiariser avec les fonctions et les accessoires suivants de votre four
avant sa première utilisation :
• Bouton Four – Ce four est doté de trois options de cuisson :
Cuisson
Cuisson à convection
Gril à convection
• Bouton Pizza – Appuyez sur ce bouton pour une pizza.
• Bouton Décongélation
– Choisissez ce bouton pour décongeler des aliments.
• Bouton Grille-pain – Choisissez ce bouton pour griller.
• Bouton Déshydratation –
Choisissez ce bouton pour déshydrater les aliments.
• Bouton Rôtisserie –
Choisissez ce bouton pour rôtir.
• Bouton Augmentation/Diminution – Pour régler la durée, appuyez sur le
bouton Minuterie et sur le bouton Minuterie/Température/Grille-pain/Couleur, vers le
haut ou vers le bas, pour choisir la durée.
• Bouton Horloge – Réglez et affichez l'heure.
•
Bouton Arrêt – Arrête le four, annule la sélection de fonction.
• Bouton de démarrage – Démarre le four une fois les réglages, la durée et la
température choisis.
• Bouton Minuterie/Température – Pour régler la température, appuyez sur le
bouton Minuterie et sur le bouton Température, vers le haut ou vers le bas, pour
choisir la température.
• Ventilateur à convection – Le ventilateur à convection se met en marche
automatiquement durant la cuisson à « fan bake, grill » et la rôtisserie.
• Grille – Grille-pain, cuisson générale et cuisson pour plats en cocotte et
plats standards.
• Plateau à miettes – Placez-le dans la fente au fond du four. Nettoyez après
chaque utilisation..
• Plateau de cuisson - Pour faire griller et rôtir les viandes, la volaille, le poisson et
autres.
• Ensemble à rôtir - Rôtit une gamme de viandes et volailles, les rendant très
tendres et juteuses à l’intérieur, dorées à la perfection à l’extérieur.
• Poignée de rôtissoire - Permet de retirer la broche à rôtir une fois le rôti cuit.
Cuisson à Convection
La cuisson à convection combine les mouvements d’air chaud d’un ventilateur aux
fonctions habituelles (cuisson et gril à convection, rôtisserie). Dans bien des cas, la
cuisson à convection est plus rapide que celle des fours grille-pain à éléments radiants.
Le ventilateur fait circuler l’air doucement dans chaque recoin du four, brunissant,
croustillant et enfermant l’humidité et la saveur. La convection permet une température
plus égale tout autour de la nourriture à l’aide du mouvement d’air, de façon à ce que la
nourriture cuise ou grille de façon égale, contrairement aux fours réguliers qui
présentent des endroits chauds et froids. La fonction de convection permet de cuire à
des températures plus faibles, ce qui sauve de l’énergie et garde la cuisine plus fraîche.
L’air de convection est surchauffé et circule autour de la nourriture, augmentant
grandement la vitesse de cuisson.