


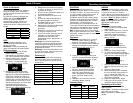
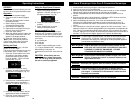
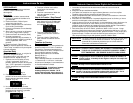

Fig. 19
Crumb
Tray
Care & Cleaning
Warning: Be sure to unplug the oven and allow it to cool before
cleaning.
To assure maximum safe operation, keep your toaster oven free of grease and build-
up of food particles. Clean the inside of the walls with a damp sponge, cloth or nylon
scouring pad and mild detergent. DO NOT USE STEEL WOOL SCOURING PADS,
ABRASIVE CLEANERS OR SCRAPE THE WALLS WITH A METAL UTENSIL, AS
ALL OF THESE METHODS MAY DAMAGE THE FINISH.
All accessories should be washed in hot soapy water or can be cleaned in a
dishwasher. The door can be wiped with a damp sponge and wiped dry with a paper
or cloth towel. Clean the outside with a damp sponge. DO NOT USE AN
ABRASIVE CLEANER AS IT MAY DAMAGE THE EXTERIOR FINISH.
DO NOT USE AN ABRASIVE CLEANER OR STEEL WOOL SCOURING PAD ON
THE BAKE PAN AS IT MAY DAMAGE THE PORCELAIN ENAMEL FINISH.
LET ALL PARTS AND SURFACES DRY THOROUGHLY PRIOR TO PLUGGING
OVEN IN AND USING.
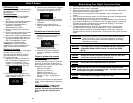
REGULARLY REMOVE CRUMB TRAY FROM SLOT AND CLEAN. (Fig. 19)
11
Fiche Technique
Tension: 120 V, 60 Hz
Intensité: 1200 watts
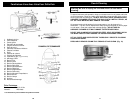
* Les illustrations peuvent différer du produit lui-même.
26
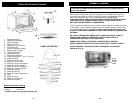
1. Habitacle du four
2. Porte rôtisserie
3. Portes grilles
4. Panneau de commande
5. Poignée froide au toucher
6. Porte de verre
7. Éléments chauffants inférieurs
8. Plateau à miettes
9. Grille
10. Plateau de cuisson
11. Poignée de rôtissoire
12. Ensemble à rôtir
(1 tige, 2 broches)
13. Affichage à DEL
14. Bouton Four
15. Bouton Pizza
16. Bouton Décongélation
17. Bouton Grille-pain
18. Bouton Déshydratation
19. Bouton Rôtisserie
20. Bouton Augmentation
21. Bouton Diminution
22. Bouton Minuterie/Température
23. Bouton d’arrêt
24. Bouton Lampe
25. Horloge
26. Bouton de démarrage
Familiarisez-Vous Avec Votre Four Grille-Pain
PANNEAU DE COMMANDE