


Version 12/04 - Page 6
INSTALL THE RANGEHOOD
1. Remove the unit from the carton and place on a flat
surface for assembly. Cover the surface to prevent accidental
damage. Remove all parts including the mounting hardware
before discarding the carton.
2. Remove the grease filters USING TWO HANDS (one to
hold the filter so that it doesn't fall on cooktop and one to turn
the knob) by pulling the knob out and turning to the left.
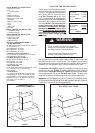
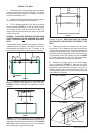
3. The rangehood is shipped from the factory in the up vent
position as indicated in FIGURE 9. For top vent applications,
no additional adjustments are necessary.
FIGURE 9
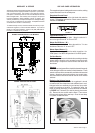
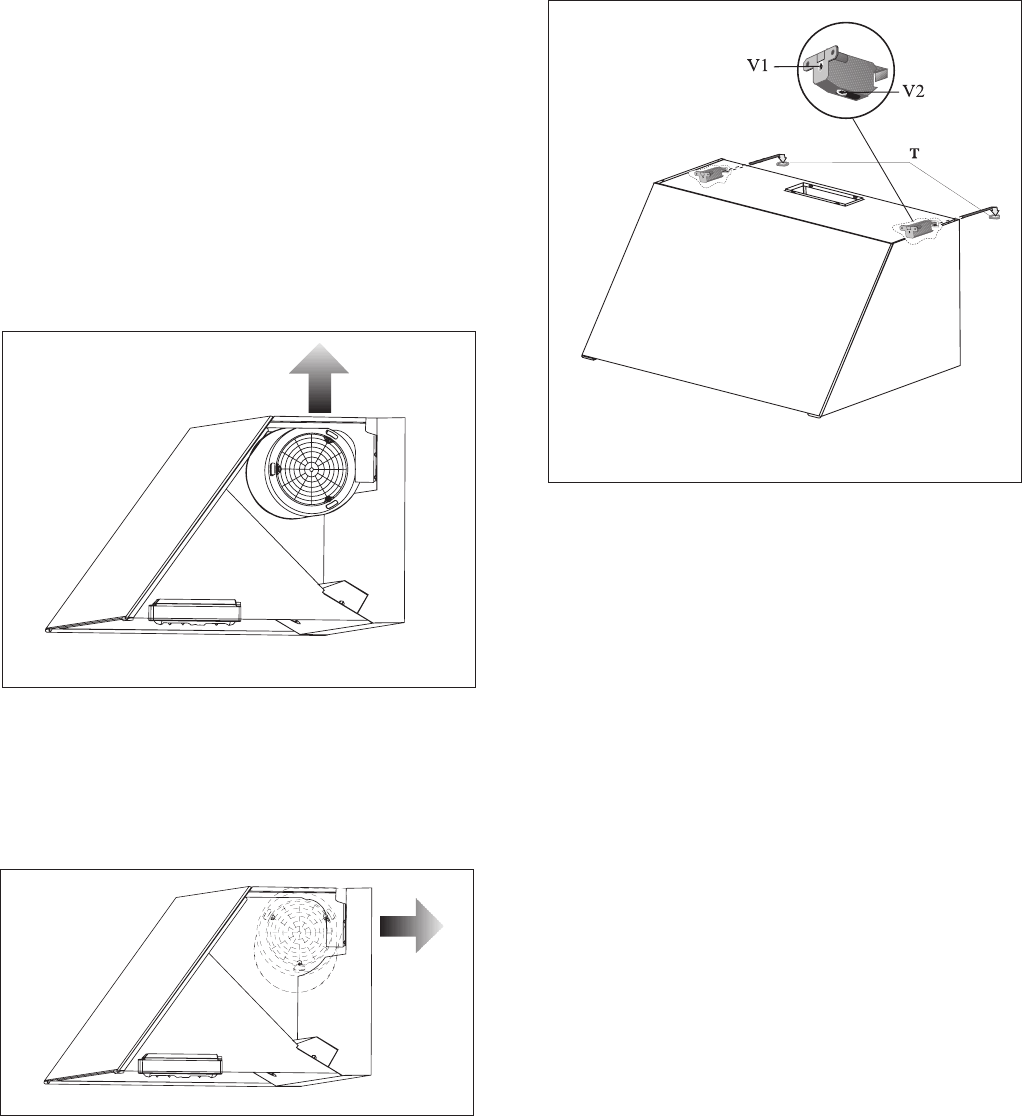
For rear vent applications, the blower must be turned inside the
rangehood so that the blower vents to the rear as indicated in
FIGURE 10. The blower is turned by removing two screws on
each side of the blower, rotating the blower with the exhaust
opening facing the rear and then replace the screws. The
exhaust cover must be moved to block the unused opening. The
blower must be converted before installing the rangehood.
FIGURE 11
FIGURE 10
4. Remove the cover from the field wiring compartment.
Remove the wiring electrical knockout using a flat-blade
screwdriver. Feed the Power Supply Cable through the
electrical knockout.
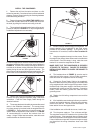
5. The canopy attaches to the wall by two screws discussed
earlier in the installation instructions. The canopy hangs
from these screws by brackets inside the rangehood shown
in FIGURE 11. Before attempting to hang the canopy, you
should rotate the adjustment screw marked V1 in
FIGURE
11 counterclockwise to extend the brackets from the
canopy. Using a Phillips head screwdriver, rotate this screw
counterclockwise to extend the bracket.
6. Install the damper before hanging the rangehood. The
damper attaches to the rangehood by two small screws
provided in the hardware package. If 48" hood is to be
connected to 10" round duct, install the Duct Transition Kit
now.
7. Hang the rangehood canopy from the screws. Due to
the weight of the canopy, these screws must be installed into
solid material! Once the canopy is hung, rotate the screw
marked V1 to secure the rangehood to the wall.
MAKE SURE THAT THE RANGEHOOD IS SECURELY
ATTACHED TO THE WALL! FAILURE TO PROPERLY
INSTALL COULD RESULT IN INJURY OR DAMAGE TO
PROPERTY.
8. The brackets shown in FIGURE 11 are also used to
adjust the level of the canopy. Using a Phillips screwdriver,
rotate the screw V2 to adjust the level of the canopy.
9. Connect the Power Supply Cable to the rangehood.
Attach the White lead of the power supply to the White lead
of the rangehood with a twist-on type wire connector. Attach
the Black lead of the power supply to the Black lead of the
rangehood with a twist-on type wire connector. Connect the
Green ( Green and Yellow ) ground wire under the Green
grounding screw.
10. Replace the field wiring compartment cover and the
grease filters.
11. If the installation uses a telescopic chimney, connect the
ductwork and install the chimney. Mount the upper chimney
section to the wall first. Then mount the lower section. The
lower section fits over the upper section.
If the installation uses a full width duct cover, install it now.
12. Turn the power supply on. Turn on blower and light.
The rangehood controls are located on the right-hand side
under the canopy. If the rangehood does not operate, check
that the circuit breaker is not tripped or the house fuse blown.
If the unit still does not operate, disconnect the power supply
and check that the wiring connections have been made
properly.