


PAGE 7 OF 8
PAGE 8 OF 8
ATTACHMENT
CHECKLIST
WARNING : Extreme care is to be taken when lifting the product as it
is very heavy. Failure to do so may result in injury.
1. Slide the product into the oven cabinet, pushing the product between the two
oven cavities or by the edges of the oven cavity.
If the product does not sit flush with the front of the oven cabinet, make
certain that the electrical supply cable has not jammed behind the product.
Ensure the bottom vent is not blocked off or damaged.
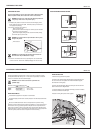
2. Securely fasten the oven to the cabinet using the screws provided. Insert the
screws through the holes in the side extrusions and through the spacers placed
between the side extrusion and the kitchen joinery (see diagram opposite).
Do not over tighten screws.
3. Replace the oven trays and wire shelves. The shelves have a
front and back. Insert them into the oven in the correct way to
ensure that the ‘stop-lock’ feature of the shelf works correctly
(see diagram opposite).
4. Refit the oven doors. This is done by:
Place both upper hinge arms in the top slots and both lower
hinge arms in the lower slots.
Push the hinges as far as they will go until the slot in the lower
arm locates in the hinge support.
Lower the door gently. Push the catches away from you off the
hooks. Make sure that they disengage properly.
Raise the door slightly and ensure the catches are released from
the hooks. The door can now be closed.
WARNING : Do not stand or sit on the doors.
screw
screw
screw
IF THE OVEN DOES NOT OPERATE:
Check that the circuit breaker has not tripped or the fuse blown.
Ensure that the electrical connections have been correctly made.
Ensure that power is being supplied to the oven.
Ensure the voltage is correct across all phases.
Ensure the clock has been set.
IF YOU NEED ASSISTANCE:
If a fault occurs consult the Problem Solver Section of your User Guide book.
Call your local Customer Care representative:
FOR NEW ZEALAND
P.O. Box 58732, Greenmount, Auckland.
Toll Free 0800 FP CARE (0800 37 2273)
Fax 09 273 0656
Email customer.care@fp.co.nz
FOR AUSTRALIA
P.O. Box 798, Cleveland, QLD 4163.
Toll Free 1300 650 590
Tel 07 3826 9100
Fax 07 3826 9298
Email customer.care@fp.com.au
Please have the model and serial number of your product ready for the
Customer Care representative.
1. Make sure product is level and securely fitted to the cabinetry and
both oven doors open and close freely.
2. Make sure all the internal packaging has been removed from the oven cavity.
3. Make sure all oven vents and openings are clear and are free of any obstruction.
WARNING :
Failure to do so may result in a fire or poor product performance.
4. Turn the power to the oven on. The clock should light up and blink 12:00pm.
5. Set the clock to the current time.
6. Turn the oven function switch to ‘Bake’ and the oven temp switch to 200
o
C. Air
should blow out of the vent at the bottom of the oven. Inside the oven cavity all three
oven lights should come on. After 5 minutes open the oven door and the air inside
should feel warm. The top element should be glowing red and the bottom surface of
the oven cavity should feel warm to lightly touch.
WARNING :
Do not touch the top element as this may result in injury.
7. Turn both the oven function switch and oven temp switch back to off and repeat
for the other oven if product is a double.
TROUBLE SHOOTING