


31
Consumer Support
Installation
Instructions
Troubleshooting Tips
Operating InstructionsSafety Instructions
Care and cleaning of the range. G
EAppliances.com
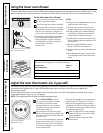
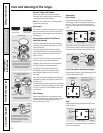
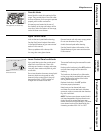
Turn all controls OFF before removing the
burner parts.
The round side burner caps and burner
heads can be lifted off, making them easy
to clean. The electrodes are not removable.
The oval center burner head and cap
assembly can be lifted off, making it easy
to clean. The burner electrode is not
removable.
CAUTION: Do not operate the
cooktop without all burner parts and grates
in place.
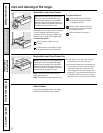
Be sure electrical power is off and all surfaces are cool before cleaning any part of the range.
WARNING:If your range is removed for cleaning, servicing or any reason,
be sure the anti-tip device is re-engaged properly when the range is replaced. Failure
to take this precaution could result in tipping of the range and cause injury.
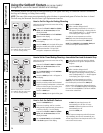
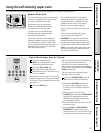
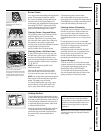
Sealed Burner Assemblies
Burner head
and cap
assembly
Center
griddle
Electrode
Electrode
Burner cap
Burner head
Burner base
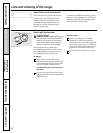
Front right burner
Make sure the hole in the burner head is
positioned over the electrode and that
the burner head is fully inserted inside
the burner base. A small gap between
the base and head is normal.
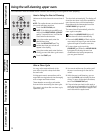
Electrode
Burner cap
Stability
chamber
Burner base
Front left burner, back right burner
and back left burner
Make sure the slot in the burner head
is positioned over the electrode.
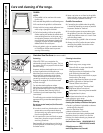
Burner head
Use a sewing
needle or twist-
tie tounclog the
small holein the
burner head.
The electrode of the spark igniter is
exposed when the burner head is
removed. When one burner is turned
to LITE, all the burners spark. Do not
attempt to disassemble or clean around
any burner while another burner is on.
An electric shock may result, which
could cause you to knock over hot
cookware.
Electrode
Electrode
Burner head
Burner base
Front right burner
Front left, back right
and back left burner