


CAm
Am
CLEANING
(continued)
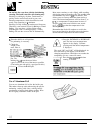
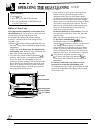
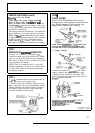
Lift-Up Cooktop
(on some models)
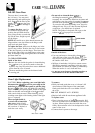
Some models have a cooktop that can be lifted up
for easier cleaning. To make cleaning easier, the
entire cooktop may be lifted up and supported in the
up position.
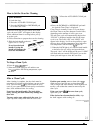
Be sure
all
surface units are turned off before
raising the cooktop. There are two side supports
that lock into position when the cooktop is lifted up.
The surface units do not need to be removed before
lifting. However, you may remove one to make
raising the cooktop easier.
After cleaning under the cooktop with hot, mild soapy
water and a clean cloth, lower the cooktop. Be careful
not to pinch your fingers.
To lower the cooktop, push the rods back and gently
lower the cooktop until it rests in place.
Surface Units and Drip Pans
To clean the surface units, turn the control to the
highest setting for
a
minute. The coils
will
burn off
any soil.
CAUTION
● Be sure
all
the controls are turned to OFF and
the surface units are cool before attempting to
remove them.
● Do not immerse the surface units in liquids
of any kind.
● Do not clean the surface units in a dishwasher.
“
Do not bend the surface unit plug terminals.
● Do not attempt to clean, adjust or in any way repair
the plug-in receptacle.
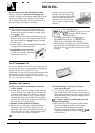
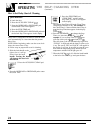
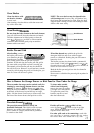
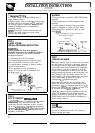
To remove a surface unit:
To remove the drip pans for cleaning, the surface units
must be removed first.
Sutiace
Unit
Receptacle
Drip Pan
Lift the surface unit about
1
inch above the drip pan
and pull it out.
Do not lift the surface unit more than 1 inch.
If you do, it may not lie flat on the drip pan when
you plug it back in.
Repeated lifting of the surface unit more than 1
inch above the drip pan can permanently damage
the receptacle.
To replace a surface unit:
● Replace the drip pan into the recess in the
cooktop. Make sure the opening in the pan lines
up with the receptacle.
● Insert the terminals of the surface
unit
through the
opening in the drip pan and into the receptacle.
● Guide the surface unit into place so it rests evenly.
Drip Pans
Remove the surface units. Then lift out the drip pans.
For best results, clean the drip pans by hand.
Place them in a covered container (or a plastic bag)
with 1/4 cup ammonia to loosen the soil. Then scrub
with a soap filled scouring pad if necessary. Rinse
with clean water and polish with a clean soft cloth.
The drip pans may also be cleaned in the dishwasher.
Black drip pans (on some models) may be cleaned in
a self-cleaning oven after they have been thoroughly
rinsed. However, self-cleaning them may cause them
to lose their original luster and shine.
Clean the area under the drip pans often.
Built-up soil, especially grease, may catch on fire.
Do not cover the drip pans with foil. Using
foil
so close to the receptacle could cause shock, fire or
damage to the range.
26
—