


– 15 –
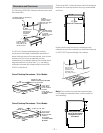
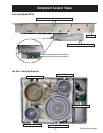
Cooktop Components
WARNING: Before servicing the cooktop, power
must be removed from the cooktop by turning the
power off at the circuit breaker.
WARNING: Sharp edges may be exposed when
servicing. Use caution to avoid injury. Wear Kevlar
gloves or equivalent protection.
Cooktop Removal From Countertop
To remove the cooktop from the countertop:
Caution: The hold-down brackets and screws
on the bottom of the burner box can damage
the countertop surface. Use care to protect the
countertop appearance.
Remove screws that attach the hold-down
brackets to the inside of the cabinet.
Note: In the following step, it will be necessary to
utilize 2 strips of wood or cardboard.
Push upward on the bottom of the burner box
approximately 4 in. and rotate slightly left or
right (to the best working advantage). Shim
under the burner box with protective wood or
cardboard as shown.
Remove the mounting screw and hold-down
bracket from each side of the cooktop.
1.
2.
3.
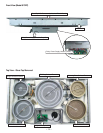
Glass Top
Note: The ceramic glass top and touch board will
be supplied as a complete assembly. If the touch
board is damaged or defective, the entire glass top
assembly must be replaced.
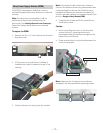
To replace the glass top:
Caution: To prevent electrostatic discharge that can
damage electronic controls, ground yourself to the
metal burner box or use an ESD wristband.
Remove the cooktop from the countertop. (See
Cooktop Removal From Countertop.)
Remove all screws along the top edge on all 4
sides of the burner box.
1.
2.
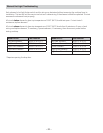
Slowly lift the front of the glass top (PP975),
or the right side of the glass top (PP945),
approximately 6 inches.
With the glass top tilted at an angle, disconnect
the wire harness that extends from the daughter
relay module (DRM) to the user interface by
pulling downward on the connector. Do not pull
on the wires.
3.
4.
Remove the glass top from the burner box. Place
the glass top on a protected surface.
5.
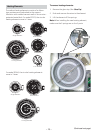
Harness
Connector
Mounting
Screw
O
N
/
O
F
F
O
N
/
O
F
F
O
N
/
O
F
F
H
O
T
S
U
R
F
A
C
E
C
O
N
T
R
O
L
L
O
C
K
P
rofile
1
2
I
N
9
IN
6
IN
O
N
/
O
F
F
W
A
R
M
I
N
G
Z
O
N
E
O
N
/
O
F
F
+
+
-
+
-
+
-
+
-
-
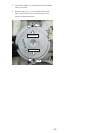
Model PP975 Shown