


12
Installation Instructions
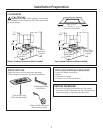
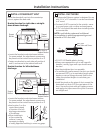
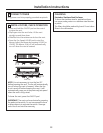
3 INSTALL CONTROL SWITCH (on some models)
Skip this step if there is no separate control switch.
Connect Wire Lead to Control Box
the mating connector.
the wire to the clamp with a wire tie. This will act
as a strain relief.
Use the mounting bracket as a template to locate
the hole accurately. Check for interference
between the switch cover, adjacent objects
and cooktop/vent overlaps.
between tiles. Use locally approved caulking to
cover any gaps.
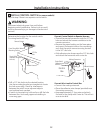
Connect Control Switch to Remote Harness
hole and attach the harness connector to the
remote connector.
and mount the remote trim on the countertop
such that the switch connectors stay located
in the 1/2"-dia. hole.
and attach the loose wire with a wire tie.
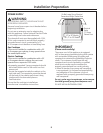
WARNING:
result in personal injury or damage to the electrical
controls.
The wiring lead is 68" long.
Control
Box
1/2"-Dia.
Hole
Foam Piece With Adhesive
Mounting Surface
Remote Switch
Strain Relief
(Adhesive wire clamp
with tie)
Remote Harness
Remote Harness
Mating Connectors
Strain Relief
(Adhesive wire clamp
with tie)