


10
Installation
Stainless Steel Interior Dishwasher
Install Custom
Door Panel
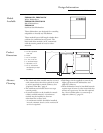
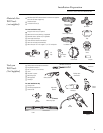
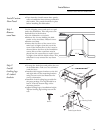
• If you intend to install custom door panels,
refer to installation instructions provided in
this booklet. The panels should be in place
before installing the dishwasher.
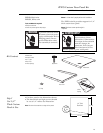
Step 1
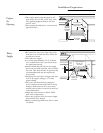
Remove
wood base
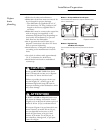
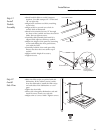
Step 2
Install
leveling legs
& toekick
brackets
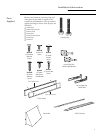
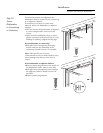
• Un-wrap the drain hose and pull to the rear
of the dishwasher. Take care not to kink or
crush the hose.
• Install toekick support brackets on the left
and right sides of the mounting brackets
using 2 screws each. See illustration for
correct orientation.
• Install the front leveling legs provided in
the parts package. The legs should be at
least 2” from the bottom edge of the
mounting bracket.
• Adjust leveling legs to installation height.
Tighten leveling leg locking nuts on the
rear.
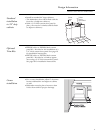
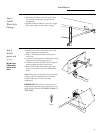
Cut the shipping carton and use it as a pad
under the dishwasher. This will protect the
finished floor in the kitchen.
• Lay the dishwasher on its back.
• Remove the 4 screws holding the dish-
washer to the wood base. Discard screws.
• Retain wood base.
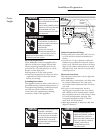
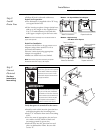
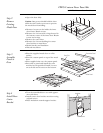
• Insure that the floor of the cutout is the
same level or higher than the rest of the
room. If the kitchen floor is tile, it may be
elevated above the floor of the installation
cutout. Pieces of the wood base may be
placed into the cutout floor to make it level
or higher than with the kitchen floor. This
will allow for easy removal for any future
service.
22-7/16"
2" Min.
Mounting Bracket
Toekick Support Bracket
Screw C