


16
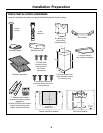
Installation Instructions
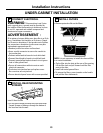
WALL-MOUNTED INSTALLATION—RECIRCULATING
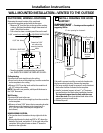
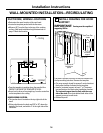
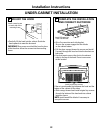
MOUNT THE HOOD
• Lift the hood onto the mounting bracket.
• Check to be sure it is level.
• Install wood screws through the hood and into the
wall on each side of the mounting bracket.
• Extend the canopy forward for better access to the
rear mounting screw holes.
• Install 2 wood screws or fasteners through the
bottom of the hood into the wall.
4
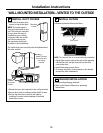
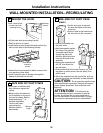
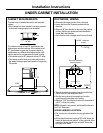
SIZE AND CUT DUCT PIECE
(cont.)
• Cut the duct piece to size and
slip onto the bottom of the duct
connector.
• Use duct tape to seal and secure
the duct piece to the connector.
• Place the assembly over
the hood outlet.
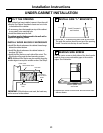
• Hold the assembly against
the ceiling. The penciled
centerline should show
through the slot in the
deflector. Mark the screw
holes on the sides of the
assembly.
• Remove the assembly and
drill 1/8” pilot holes into
the wall studs.
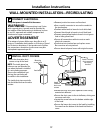
• Enlarge holes that did not enter studs to 3/8” and
tap plastic or metal anchors into the holes, flush
with the wall.
• Mount the assembly onto the hood outlet, push up
against the ceiling and install the screws provided.
CAUTION: Do not use sheet metal screws
at the hood flange connection. Doing so will prevent
proper damper operations. Seal connection with
tape only.
ATTENTION : N’utilisez pas de
vis autotaraudeuses pour connecter le rabat de
la hotte. En utilisant des vis, vous empêchez le
bon fonctionnement du volet de fermeture. Scellez
la connection uniquement avec du ruban adhésif.
5
Install bottom
mounting
screws
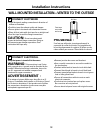
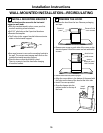
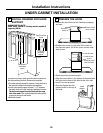
SIZE AND CUT DUCT PIECE
• Hold upper air deflector with
duct connector against the
ceiling.
• Measure from the bottom of
the air deflector to the top of
the hood as shown. Reduce
that dimension by 1” to
facilitate installation.
The duct will cover
and overlap the
deflector and the
hood outlets.
5
Duct length
Measure
length
Install a wood screw
on each side of the
mounting frame
Mounting
bracket