


4
3
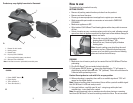
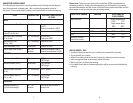
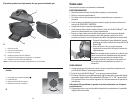
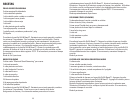
Product may vary slightly from what is illustrated.
1. Roaster lid with handle
2. Heating plates
3. Roaster body
† 4. Drip tray (Part # GV6S-01)
5. Cord wrap (behind roaster; not shown)
† 6. Bake pan (Part # GV6S-02)
Note: † indicates consumer replaceable/removable parts
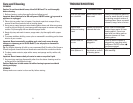
How to use:
This product is for household use only.
GETTING STARTED
• Remove all packing material and any stickers from the product.
• Remove and save literature.
• Please go to www.prodprotect.com/applica to register your warranty.
• Wash removable parts and/or accessories as instructed in CARE AND
CLEANING.
• Make sure appliance is OFF.
• Wipe inside of Grill & Roast™ and heating plates with a damp cloth to remove
all dust.
• Select a location on your countertop where unit is to be used, allowing enough
space from back of appliance and wall to allow heat to flow without damage to
cabinets and walls.
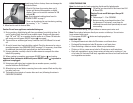
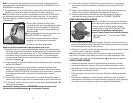
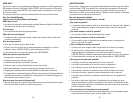
• Place drip tray under front section of bottom
heating plate of Grill & Roast
™
(C).
• Before first use, if desired, lightly oil bottom
heating plate.
Note: Aerosol cooking spray should not be used
on nonstick surface. Chemicals that allow spray
to come out of can build up on surface of heating
plates and reduce their efficiency.
COOKING
1. Make sure size of meat or poultry to be roasted fits into Grill & Roast™ before
preheating.
2. Plug Grill & Roast™ into a standard electrical outlet.
3. Press power ON/OFF button
( )
above the digital display; “5” will appear in
digital display and will alternate with “PH” (preheat). Timer will count down for
5 minutes while preheating occurs.
Caution: Do not preheat or cook with lid in an open position.
4. When preheating is complete, there will be an audible signal and “ON” will
appear on the digital display.
Note: If desired cooking time is not entered, there will be a periodic audible signal
that Grill & Roast
™
is ON and ready to cook.
5. Using pot holders, carefully open lid and – using tongs with nylon heat-
resistant tips – insert food to be cooked.
Note: Use only heatproof nylon or wooden utensils when placing or removing
food from Grill & Roast™ to avoid scratching nonstick surface. Do not use metal
1.
6.
4.
3.
2.
+
_
1.
4.
3.
2.
1. Power ON/OFF button ( )
2. Digital display
3. Timer up button (
+
)
4. Timer down button (
-
)
CONTROL
A
B
+
_
C