


NOTE: If you have the casters installed on your freezer, the
leveling screws will not work. Shims can be placed under the
casters to level a freezer that has casters installed.
Door Closing
Your freezer has two front adjustable rollers - one on the right and
one on the left. If your freezer seems unsteady or you want the
doors to close easier, adjust the freezer's tilt using the
instructions below:
1. Plug into a grounded 3 prong outlet.
2. Move the freezer into its final position.
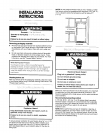
3. Remove the base grille (see Base Grille graphic). The two
leveling screws are part of the front roner assemblies which
are at the base of the freezer on either side.
4. Use a screwdriver to adjust the leveling screws. Turn the
leveling screw to the right to raise that side of the freezer or
turn the leveling screw to the left to lower that side. It may
take several turns of the leveling screws to adjust the tilt of
the freezer.
NOTE: Having someone push against the top of the freezer
takes some weight oft the leveling screws and rollers. This
makes it easier to adjust the screws.
5. Open both doors again and check to make sure that they
close as easily as you like. If not, tilt the freezer slightly more
to the rear by turning both leveling screws to the right, It may
take several more turns, and you should turn both leveling
screws the same amount.
6. Replace the base grille.
Door Alignment
If the space between your doors looks uneven, you can adjust it
using the instructions below:
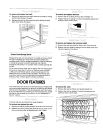
1. Pry off the top hinge cover.
2. Loosen the top hinge screws using a %6in. socket or wrench.
3. Have someone hold the door in place or put a spacer
between the doors while you tighten the top hinge screws.
4. Replace the top hinge cover.
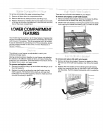
5. Place the freezer on its side on top of the cardboard or
protective material. Make sure the door hinge is facing
upward.
IMPORTANT: It is important that the door hinge face
¸¸iii ii¸¸ii :i!!ii :iii :::::: iiiiiiii :::iiiiiiii ::; iii¸
Check that you have everything necessary for correct assembly.
Proper assembly is your responsibility.
Tools Needed:
• V2in. Socket wrench or nut • 3/8in. Socket wrench or nut
driver driver
• V2in. Wrench
Parts Supplied:
• Rigid Casters (2)
• Swivel Casters (2)
• 5/16-18 Self-locking •
hex-nuts (16)
• %6-18 x 7/8in. Hex-head bolts •
(I 6)
• V4-20X 1 V4in. Hex-head
bolts (4)
V4-20 x 1 V4in. lock
washers (4)
Caster brackets (located in
FeaturePak) (2)
Plastic skids (shipped with
the freezer)
1. Before you begin, turn the lower compartment control to off,
unplug freezer or disconnect power.
2. Remove food and any adjustable shelves and bins from
freezer.
3.
4.
Open the lower compartment door and remove the base
grille. Remove the grille by grasping the grille with both
hands, lifting up and pulling bottom of the grille toward you.
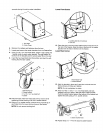
Place the plastic skids (shipped with the freezer) on the floor
at least 3 ft. (91.44 cm) apart. Lay a piece of cardboard or
other protective material over the skids. This will elevate the
freezer to allow for easier caster installation and also protect
it from scratches.
NOTE: If the skids have been discarded or are not available,
2 in. x 4 in. boards may be used.