


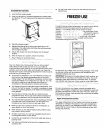

upwardsduringtheentirecasterinstallation. Lower Front Corner
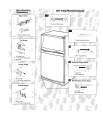
1. Top Hinge
2. Center Hinge
6. Remove the casters and fasteners from the box.
7. Locate and remove the caster brackets from the FeaturePak.
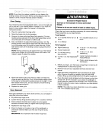
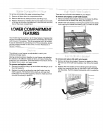
8. Using 5/_e-18x 7/8in. hex-head bolts, attach 1 rigid caster and
1 swivel caster to each caster bracket. The rigid caster fits
the front of the bracket and the swivel caster fits on the rear.
9. Insert the hex-head bolts from the bottom and start the self-
locking nuts for each caster.
3
4
1. Selfqocking nut
2. Caster bracket
3, 5/_-18 x _in. hex-head bolt
4. Caster
10. Hold the head of the hex-head bolts with a wrench while
tightening the self-locking nuts with a socket wrench.
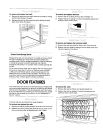
11. Using a 1/2in. socket wrench, remove the 4 unit bolts (2 on
each side) from the lower front and rear of the freezer.
NOTE: Do not remove leveling bolt.
1. Leveling bolt (do not remove)
2. Unit bolt
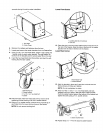
12. Place the slot in the rear of the caster bracket over the hole in
the rear of the freezer. Align the hole in the front of the caster
bracket with the hole in the front of the freezer.
Lower Rear Corner.
2
I. Rear freezer hole
2. Caster Bracket
13. Hold the bracket in place and insert the unit bolts into the
front and rear unit holes and tighten.
NOTE= Do not overtighten the bolts.
14. Insert 2 of the V4- 20 x 1 V4in. hex-head bolts and lock
washers into the 2 holes in the side of the caster bracket.
Push the caster bracket against the bottom of the freezer and
tighten the bolts using a 3/8in. socket wrench.
I. Casterbracketholes
15. Repeat steps 12 - 14 for the second caster bracket.