


Electrical Hook-up and Start-Up Procedure (All Models) (Do not plug in unit yet!)
Important: This equipment must be installed in compliance with applicable Federal, State, and/or
Local electrical codes having jurisdiction. Do not use extension cords. Make sure that
outlet brewer plugs into is grounded.
Important: Make sure “Main Power Switch” in back of unit is in “off” position before
plugging in brewer.
Important: Domestic Q models at 208/230V must have a 4 wire electrical connection. Circuit
must have 2 hots, 1 ground, and 1 neutral wire. Failure to install with 4 wire
connecion will void
manufactures’ warranty. Grind’n Brews that are 208/230 volt
require a 20 amp circuit. Export “E” models must have a 3 wire electrical
connection. Circuit must have 2 hots, and 1 ground (no neutral).
1. Plug in brewer to electrical outlet. (Or run power to unit for hardwire applications)
2. Make sure brewbasket is inserted in brewrails.
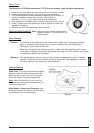
3. Reach to the back of the brewer and press the white “main power switch” to the “on”
position. The front control lights will go on and you will hear water entering the brewer. The
tank will fill in 2-3 minutes from the moment you pressed the “main power switch” to “on”.
4. Now that the tank is full, it will take 10-15 minutes to heat the water to brewing temperature.
(Cut that time in half for the 230V “Q” models). Once the “ready” light is lit, you are ready to
brew.
Brewing
Important: Brewers are factory set for the correct grind and brew times for average situations. You
should not need to make adjustments in the field.
1. Make sure new paper filter is in the brewbasket and brewbasket is in place in brewer.
2. Place beans in hopper.
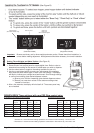
3. Choose to “Grind and Brew”:
Basic Models-Press switch to “Grind
’
n Brew”
“H” Half batch models or all dual bean models-Press far right touchpad so “grind” and
“brew” lights are lit.
4. Choose Portion:
Basic models-no choice, only full batch.
“H” Half batch models or all dual bean models-choose full or half by pressing touchpad until
desired volume is lit.
5. Choose decaf or regular coffee (only applicable to dual bean Grind ’n Brews). Press left
touchpad. Arrow will either point left or right for “decaf” or “regular”.
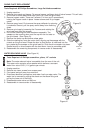
6. Place decanter or airpot under brewbasket depending on model.
7. Press Start. You will see coffee bean level go down slightly. You will hear coffee grind.
Coffee automatically is ground and portioned and placed in brewbasket. Then ground coffee
is automatically brewed. The “ready” light will now blink signifying that grinding and brewing
is in process. This will take 3-4 minutes for a 1,7L - 1,9L pot. Portions are factory set. After
brewing a pot, the tank must reheat. Reheat times are 5 1/2-8 minutes for 120V brewers
and half that for 230V machines. Remember, the brewer will not function (although the
grinder will) until the “ready” light is on, indicating the water is hot enough to brew. A
flashing green light means brewer is reheating or there is a cycle in progress. Do not
remove brewbasket while flashing.
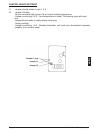
8. On models GNB-11(11Q)(10)(10Q), press rocker switch to “Grind Only” position when you
wish to grind coffee but not brew. This will allow you to grind coffee for other brewers in
use. For “H” half batch and dual bean models, use following instructions on operating the
touchpad.
Page 4 Grind ’n Brew Coffee Systems
English