


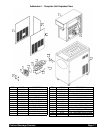


Service and Maintenance
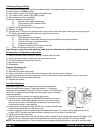
Servicing Dispensing Valves, O-Rings, and Freeze Cylinder Drive Shaft/Seal Assemblies
NOTE: Dispensing valve "O" Rings should be replaced every 120 days to correspond with quarterly preventative
maintenance visits.
The best technique for removing an "O" Ring is to first wipe off all of the lubricant using a clean paper towel. Pinch
the "O" Ring upward with a dry towel between your finger and thumb. When a loop is formed in the "O" Ring, roll it
out of the groove with your thumb. Always remove the "O" Ring farthest from the end of the plunger first. (See
Figure 13)
Crathco Beverage Freezers
Page 13
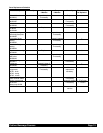
Quarterly Preventative Maintenance
Quarterly Preventative Maintenance is recommended to extend the life of the machine. Preventative Maintenance
visits include sanitizing the entire system, checking for and replacing any worn parts, optimizing operating
conditions. See the parts replacement schedule at the end of this section.
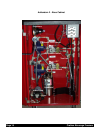
Sanitizing Entire Liquid Systems
It is essential that the entire liquid system be sanitized every 3 months by a qualified technician. Follow the above
instructions.
NOTE: Clean and sanitize the entire liquid system before and after storage.
Routine Product System Sanitizing
Note: During sanitizing, all "O" Rings and seals should be inspected for damage
1) Drain product from freezing cylinder barrel
a) Turn freezer switch to "CLEAN".
b) Close manual syrup feed valve in back lower compartment of the cabinet.
c) Close manual alcohol feed valve in back lower compartment of the cabinet.
d) Place container under product dispensing valve, open dispensing valve handle.
e) Continue to remove product until it starts to become semi-clear and has a liquid consistency.
f) Close manual carbonated water feed valve in back lower compartment of the cabinet.
g) Drain remaining product. If liquid flow stops before the freezing cylinder is empty pull vent (round
ring) in valve block and break vacuum.
2) Remove product from BIB supply lines
a) With freezer in "CLEAN" mode, disconnect BIB connectors.
b) Open manual syrup valve in back lower compartment of the cabinet.
c) Place a container under test line and open test port manual valve.
d) Turn the control switch in lower cabinet to "TEST".
e) Turn test switch to "ON".
f) Allow pump to operate until it stops.
g) Move BIB connector to other BIB container and repeat steps (e) and (f) above.
h) Install a cleaning connector to BIB connector that is indicated as active by the switch on the BIB
vacuum transfer valve.
i) Put line with connector into a container of clean water.
j) Repeatedly cycle the "TEST" switch to "OFF" then to "ON" until the line is clear of syrup.
k) Repeat process for alternate BIB hose starting at (g) above.
l) When the syrup lines are clean close the manual syrup line valve.
3) Remove product from Alcohol supply lines
a) With freezer in "CLEAN" remove the alcohol bottles from storage rack.
b) Open the manual alcohol valve in the back lower compartment of the cabinet.
c) Place a container under test line and open manual test port valve.
d) Move control switch in lower cabinet to "TEST". Turn test switch to "ON".
e) Allow pump to operate until it stops or all alcohol is removed.
f) Pour clean water into the alcohol rack reservoir .
g) Cycle the test switch from "OFF" to "ON" until the line is clear of alcohol.
h) When lines are clean close the manual valve on alcohol line.
Complete the sanitizing procedure by following the steps in the Sanitizing & Starting Unit Section.