


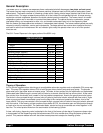


Periodic Inspection
Freezer Assembly and Installation
1) Check the CO2 tank pressure gauge on the cylinder regulator assembly. Replace if tank pressure drops below
red line.
2) Make sure the unit contains a sufficient supply of syrup and alcohol.
3) Check to see that there is sufficient air space on both sides of the unit. Proper air circulation is required for
efficient operation. Make sure that the louvers are not obstructed at any time. CAUTION: Failure to provide
minimum air flow clearance will void the freezer warranty. (See Locating Freezer)
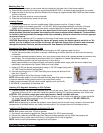
1) Unbox freezer (top half)
a) Remove both side panels and then use a 7/16” socket to remove the 2
bolts at the bottom of the freezer that hold it to the shipping pallet.
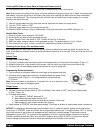
b) Cut the wire tie (note red tag) on freezer drive motor. (Figure 2)
c) Leave right side panel (when facing front of freezer) off.
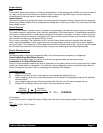
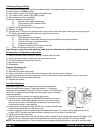
2) Place a bead of silicone sealant all the way around the edge of the base
cart top. (See Figure 3)
3) Place beverage freezer onto the base cabinet on top of the bead of silicone.
Position freezer over mounting holes before sealant sets. (Figure 4)
4) Secure top half of unit to base cart by installing 7/16" bolts and nuts using
the same holes used to secure the freezer to shipping pallet.
5) Open rear door of base cabinet and place black plastic bushing in wire hole in the top
of the cabinet.
6) Feed the 2-multi-pin connectors found in the freezer down into the base cabinet
through the hole in the top of the lower cabinet. Connect each connector from the
cabinet to matching connector in the freezer. (See Addendum 5)
CAUTION: Do not leave too much slack in the wires as they could get caught in the fan
blades. Use wire tie and holder to secure wires in place. See electrical diagram.
7) Remove the base cart electrical box cover (located in the upper right corner of the base
cart). Feed the power cord (found inside lower rear right side of freezer, near the terminals)
through hole into the base cart and then feed it into the hole in the rear of the electrical
box. Connect power cord wires. (See Addendum 3 and 4)
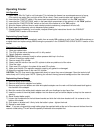
8) Route the product feed tubing (located in the freezer) down through hole into base cabinet.
Route the tubing to the top part of the freezer following the same path as the wiring.
9) Attach the tubing to the John Guest 90° elbow fitting which is located in the base cabinet behind the electrical
box. Make certain that the tubing is pushed all the way into the fitting. (Figure 5)
10) Replace freezer side panels.
11) Turn "on/off/clean" switch on front of unit to the OFF position.
Figure 2
Figure 3
Figure 4
90° Support
Product Feed Tubing
Figure 5
Attaching Freezer to Base Cart
Page 4 Crathco Beverage Freezers