


Page 3
Operation
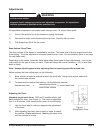
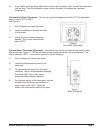
1) RAPS Brewers require the accessory warmer base placed over the pegs on the brew
shelf before brewing into a shuttle. Plug the base into the receptacle on the side of the
brewer. The receptacle is only energized when a shuttle is in place.
2) Place an empty, warm shuttle or airpot on the shelf, counter, or accessory base (depending
on model) under the brew head. Turn on the warmer if a shuttle is used.
3) If the shuttle is not warm, allow the warmer to heat the shuttle. Only a short brew of water
will speed this. A cold shuttle will significantly lower the temperature of the brewed coffee.
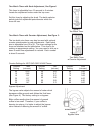
4) Remove the filter basket and line with a filter paper. Paper size is 13 x 5 for the smaller
basket, BB1.5, and 14 x 5 for the larger, BB2.0.
5) Place ground coffee in the filter basket. Your coffee supplier can help you select the right
amount of coffee and grind. Coffee brewing experts recommend between 6.5 and 8 ounces
of coffee per gallon of water for most applications. A full shuttle is 1.4 gallons and a full
airpot is 0.80 gallon.
6) Slide the basket into the brewer making sure the spout lines up with the top of the shuttle
or airpot.
7) Check that the correct batch size is selected. Check the WATER HOT light. If lit, press start.
8) Brew time is about 4 minutes for a full shuttle, less for airpots and half batches. After the
brew, allow the coffee to drip for 1 to 2 minutes.
9) Dump the grounds from the basket and rinse for the next brew. Coffee is ready to serve.
10) The shuttle may be placed on remote warming stations. Use caution when moving a
full shuttle.
Shuttle Brewers & Airpot/Shuttle Brewers
CAUTION
Coffee basket contains very hot water until the drip is completed. Early removal of a
dripping basket could result in burns.
CAUTION
HOT LIQUID HAZARD!
Water used for brewing coffee is very hot. Use caution when brewing, pouring, or
transporting coffee. Accidental spills may result in severe burns.