


Page 10 Crathco
®
Post Mix Beverage Dispensers
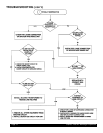
MAINTENANCE
Daily:
System Flushing (See pages 7-8)
Weekly:
System flushing and washing (See pages 8-9)
MAINTENANCE (cont.)
Biweekly:
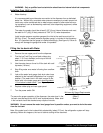
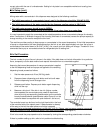
Sanitizing (See page 8-9). Ice bank water level check up. (See figure J)
Note: Make sure that water level in the drain tube is even with tank overflow outlet.
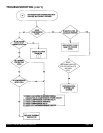
Monthly:
1. Check the condenser for dust build up. If necessary clean the condenser with a bristle brush.
2. After sanitizing, remove dispensing base assembly and wipe off the interior of the cabinet with a cloth
dampened in sanitizer.
3. Check the platform of the dispensing base assembly and clean it using sanitizer solution. Replace
dispensing base assembly.
4. Clean cabinet cooling system drain with a small bottle brush and sanitizer solution.
5. Check water level to ensure it is maintained at aproper fill level (See page 4). Filling the ice bank with water.
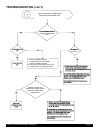
Every half of the year:
1. Replace all pump tubing. If pumps are loosing their capacity and adjusting pump speed does not correct the
problem, replace tubing on a more frequent basis.
2. Remove cabinet cooling system and wash it. Remove cooling fan prior to washing. If necessary separate the
cooling coil from the plastic shroud and wash them separately. Rinse
thoroughly both parts. Wipe off plastic shroud with dry cloth. Replace the
cooling system.
Every two years:
Inspect pump housings and pump rollers. Clean inside pump housings.
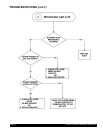
Merchandiser Bulb Replacement
WARNING: Disconnect machine from branch electrical supply before
changing the light bulb.
1. Remove merchandiser graphic by pushing its edge towards the center
of the merchandiser causing it to bow.
2. Repeat the same with clear plastic graphic reinforcement.
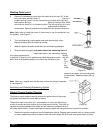
3. Remove the old light bulb by gently turning the lightbulb 1/4 turn to the
left and pulling the bulb from the socket. (See figure K)
4. Install the new bulb by lining up the pins on either end of the bulb parallel with the socket opening.
5. Gently insert both ends of the bulb into the socket and turn the bulb 1/4 turn to the right until the bulb locks
into place.
6. Replace the merchandiser photo and cover.
(Figure K)