


Page 4 Crathco® Post Mix Beverage Dispensers
WARNING: Only a qualified service technician should service internal electrical components.
Installing Your Unit (cont.)
4. Water Hook-up.
It is recommended to provide water connection to the dispenser from a dedicated
water line. Without this, consistent water pressure necessary to sustain proper brix
levels may not be maintained due to water surges caused by other water-consum-
ing equipment, such as dishwashing machines, other dispensing equipment, coffee
machines etc!
The water line supply should be at least 3 2/5” (8 mm) internal diameter and must
be rated for 217 psig (15 bar) pressure at 70ÞF (21°C) water temperature.
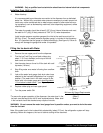
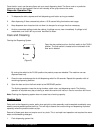
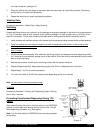
Install a water pressure regulator gauge at the inlet to the machine and set it to
29 Psig (2 bar). The water pressure regulator gauge, is included in the Accessory
Box. It is important that the gauge is installed accordingly. (See figure A) Failure to
comply will damage the gauge and render it inoperable.
Filling the Ice bank with Water
1. Remove the rear upper panel from the dispenser.
2. Find the Ice Tank Plug (round black rubber plug
about 1” (2.5 cm) diameter) on the top of the ice
bank cover and remove it.
3. Use the water hose or funnel to fill the tank with cold
tap water (18 liters.)
4. Stop filling water once water is flowing from overflow
drain.
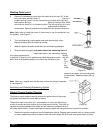
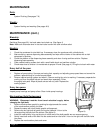
5. Look at the water level gauge (tank drain clear hose
attached to the insulated refrigeration line in upright
position.) The water level in the tank is equal to the
water level in the water gauge and should be about
1.5 cm below ice bank cover. *(see Figure B)
6. Replace rubber plug and rear upper panel.
7. Turn the power switch ON.
*To assure the proper operation of the dispenser, the water level in the
ice bank must be kept at the full fill level explained above. Water level
in the ice bank should be checked every couple of months.
WARNING: Do not remove the water level gauge from its position unless you want to drain the water
from the ice bank.
Note: If the water level in the ice bank falls substantially (about 2”/5 cm), the refrigeration system will stop
operating. Before this happens, the loss of cabinet cooling will be observed.
Overflow
Drain
Water Level Gauge
(Figure B)
(Figure A)
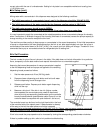
Air In
Water Level
1.5 cm below top
cover
Back of unit
Ice Tank Plug
›
›
›
›
›
›
Air Out
Minimum Air Space Requirements
Top 12”
Sides 2”
Back 4”