


8
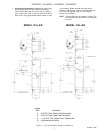
OVLERQ*C OVLSRQ*C OVLESRQ*F OVLSERQ*F
97793C - 10/01
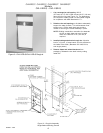
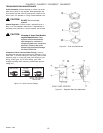
5. Install fountain: Remove access cover plate on
underside of fountains and SAVE the screws. Mount
the fountains to the upper panel and frame with
(4) 5/16 x 3/4 (19mm) long bolts and nuts provided.
Tighten securely.
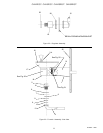
6. Remove elbow from end of p-trap and attach it to
drain tube. Re-attach elbow to p-trap and cut waste
tube to required length using plumbing hardware and
trap as a guide.
7. Make connection between remote chiller outlet tube
and fountain strainer. Insert the water inlet line into
inlet side of strainer by pushing it in until it reaches a
positive stop, approximately 3/4 (19mm). Turn on
water supply and check for leaks.
REQUIRED TOOLS AND MATERIALS
These tables show special tools and/or additional
materials (not provided) which are necessary to complete
installation of these units:
Special Tools
Item Description Quantity
NONE
Additional Materials
Item Description Quantity
1 Unplated copper inlet pipe
2 Service St
op
OVL-II ER-Q/SR-Q/SER-Q/ESR-Q INSTALLATION
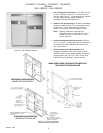
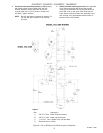
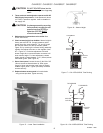
1. Assemble and place frame in wall as shown on
preceding pages.
2. Install chiller: Remove front panel of chiller. Remove
and discard cardboard inner pack from between
compressor and side panel. Slide chiller onto the
shelf and position it to the left within the guides on the
shelf.
NOTE: Building construction must allow for
adequate air flow on both sides, top and
back of chiller. A minimum of 4 (102mm) on
both sides and top is required. See chiller
installation for additional instructions.
3. Make water supply connections: Attach an unplated
copper water inlet line and a service stop (not
provided) to the chiller. Inlet port is marked on the
chiller (3/8 O.D. copper tube). Bend the copper tube
(provided) at an appropriate length from the chiller to
opening in frame. Install a 3/8 O.D. tube tee fitting
(provided) on the marked chiller outlet port. Turn on
the water supply and flush the line thoroughly.
4. Hang the upper panel on the mounting frame
hanger: Align holes in the panel with the holes in the
mounting frame. Be sure that panel is engaged with
hanger at top of frame before releasing it.
Note: With OVL-II SER-Q or OVL-II ESR-Q models, the
standard reach fountain must be mounted at the
upper position on panel.
Figure 12 Chiller Installation
Figure 14 Fountain Installation
Figure 13 Upper Panel Installation