


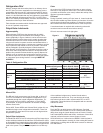
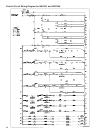

14
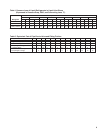
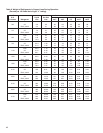
Table 7. System Troubleshooting Chart
PROBLEM POSSIBLE CAUSES POSSIBLE CORRECTIVE STEPS
Compressor will not run 1. Main switch open. 1. Close switch.
2. Fuse blown. 2. Check electrical circuits and motor winding
for shorts or grounds. Investigate for possible
overloading. Replace fuse after fault is corrected.
3. Thermal overloads tripped. 3. Overloads are automatically reset. Check
unit closely when unit comes back on line.
4. Defective contactor or coil. 4. Repair or replace.
5. System shut down by safety devices. 5. Determine type and cause of shutdown and
correct it before resetting safety switch.
6. No cooling required. 6. None. Wait until calls for cooling.
7. Liquid line solenoid will not open. 7. Repair or replace coil.
8. Motor electrical trouble. 8. Check motor for open windings, short circuit
or burn out.
9. Loose wiring. 9. Check all wire junctions. Tighten all
terminal screws.
10. Phase loss monitor inoperative. 10. Refer to page 18.
Compressor noisy or vibrating 1. Flooding of refrigerant into crankcase. 1. Check setting of expansion valves.
2. Improper piping support on suction or 2. Relocate, add or remove hangers.
liquid line.
3. Worn compressor. 3. Replace.
4. Scroll compressor rotation reversed. 4. Rewire for phase change.
High discharge pressure 1. Non-condensables in system. 1. Remove the non-condensables.
2. System overcharges with refrigerant. 2. Remove excess.
3. Discharge shutoff valve partially closed. 3. Open valve.
4. Fan not running. 4. Check electrical circuit.
5. Head pressure control setting. 5. Adjust.
6. Dirty condenser coil. 6. Clean.
Low discharge pressure 1. Faulty condenser temperature regulation. 1. Check condenser control operation.
2. Suction shutoff valve partially closed. 2. Open valve.
3. Insufficient refrigerant in system. 3. Check for leaks. Repair and add charge.
4. Low suction pressure. 4. See corrective steps for low suction
pressure.
5. Variable head pressure valve. 5. Check valve setting.
High suction pressure 1. Excessive load. 1. Reduce load or add additional equipment.
2. Expansion valve overfeeding. 2. Check remote bulb. Regulate superheat.
Low suction pressure 1. Lack of refrigerant. 1. Check for leaks. Repair and add charge.
2. Evaporator dirty or iced. 2. Clean.
3. Clogged liquid line filter drier. 3. Replace cartridge (s).
4. Clogged suction line or compressor 4. Clean strainers.
suction gas strainers.
5. Expansion valve malfunctioning. 5. Check and reset for proper superheat.
6. Condensing temperature too low. 6. Check means for regulating condensing
temperature.
7. Improper TXV. 7. Check for proper sizing.
Little or no oil pressure 1. Clogged suction oil strainer. 1. Clean.
2. Excessive liquid in crankcase. 2. Check crankcase heater. Reset expansion
valve for higher superheat. Check liquid line
solenoid valve operation.
3. Low oil pressure safety switch defective. 3. Replace.
4. Worn oil pump. 4. Replace.
5. Oil pump reversing gear stuck in wrong 5. Reverse direction of compressor rotation.
position.
6. Worn bearings. 6. Replace compressor.
7. Low oil level. 7. Add oil and/or through defrost.
8. Loose fitting on oil lines. 8. Check and tighten system.
9. Pump housing gasket leaks. 9. Replace gasket.
Compressor loses oil 1. Lack of refrigerant. 1. Check for leaks and repair. Add refrigerant.
2. Excessive compression ring blowby. 2. Replace compressor.
3. Refrigerant flood back. 3. Maintain proper superheat at compressor.
4. Improper piping or traps. 4. Correct piping.
Compressor thermal protector 1. Operating beyond design conditions. 1. Add facilities so that conditions are within
switch open. allowable limits.
2. Discharge valve partially shut. 2. Open valve.
3. Blown valve plate gasket. 3. Replace gasket.
4. Dirty condenser coil. 4. Clean coil.
5. Overcharged system. 5. Reduce charge.