


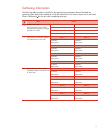

Configuring the Shared Storage
The following table provides a checklist of the steps necessary to configure the MSA1000 storage.
Place a checkmark (3) in the box after completing each step.
3
Configuring the Shared Storage
Power on Node 1 and log into the domain.
From the desktop of Node 1, select Start Æ Programs Æ Compaq/HP System Tools Æ hp Array
Configuration Utility Æ hp Array Configuration Utility.
Note: The Internet Connection Wizard pop-up screen may appear. Internet Explorer must be configured appropriately in
order to use the HP Array Configuration Utility. Also, be sure to read the security alert pop-up screen. The Internet
Explorer security level may need to be modified in order to use ACU.
Select the MSA1000 controller to configure the shared storage hard drives. Refer to the user guide for the MSA1000
storage system for additional details.
If sharing an MSA1000 between multiple clusters, Selective Storage Presentation (SSP) is required for configuration.
Refer to the ACU documentation for information on using SSP.
Configure the shared storage drives.
IMPORTANT: Create a logical drive using ACU on one of the MSA1000 arrays with at least 510MB of space.
Microsoft recommends at least 500MB for the cluster Quorum drive. The extra space for the logical drive size specified
in ACU is to account for internal disk size calculations used by ACU. Specifying 510MB will ensure that this size of this
disk will be at least 500MB of formatted drive space for use as the Quorum drive. Refer to Microsoft Knowledge Base
Article – 280345 or the help documentation on the cluster node for more information on cluster disk sizes.
http://support.microsoft.com/default.aspx?scid=kb;EN-US;280345
After the shared storage drives are configured, select Start Æ Programs Æ Administrative Tools Æ Computer
Management. Then select Disk Management to create volumes out of the logical drives.
Important: DO NOT upgrade the logical drives from Basic to Dynamic. Microsoft Cluster Services does not support
dynamic disks.
Be sure to assign drive letters and format the volumes as NTFS.
Close Disk Management for Microsoft Windows Server 2003, Enterprise Edition.
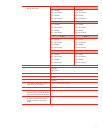
Creating the Cluster
The following table provides a checklist for creating the cluster from Node 1. Place a checkmark (3)
in the box after completing each step.
3
Creating the Cluster
From Node1, select Start Æ Programs Æ Administrative Tools Æ Cluster Administrator.
Select Create New Cluster from the Action drop-down box. Click OK.
Click Next on the welcome screen.
Select the domain to create the cluster in and enter a name for the cluster. Click Next.
Enter the name of the first server to be in the cluster. Click Next.
When the cluster wizard finishes analyzing the configuration, click Next.
Enter the IP address for the cluster. Click Next.
Enter the username and password for the cluster. Click Next.
Verify the proposed cluster configuration. Click Next.
When the wizard has finished creating the cluster, click Next, and then click Finish.
Select Start ÆControl Panel Æ HP Management Agents. In the list of Inactive Agents, select Clustering
Information and click Add to move this agent to the list of active agents and click OK.
9
Restart the agents when prompted.