


– 3 –
UNPACKING
Immediately after unpacking, check for possible shipping damage. If the cutter mixer is found to be
damaged, save the packaging material and contact the carrier within 15 days of delivery.
Prior to installation, verify that the electrical service agrees with the speci cations on the machine data
plate located on the frame behind the control box.
ASSEMBLY
Remove the cutter mixer from the skid and install rubber feet as follows: Apply a bead of silicon sealant
(not provided) around the edge of each leg. Insert a rubber foot onto each leg and fasten with bolts and
washers provided. Match the shape of the foot to conform to the shape of the leg. Two of each style
are included.
NOTE: Optional right and left casters (with rubber caster pads) are available for installation on the
two legs on the control panel side. Assemble with the bolts and washers provided for the rubber
feet.
Place cutter mixer in the desired location.
ELECTRICAL CONNECTIONS
WARNING: ELECTRICAL AND GROUNDING CONNECTIONS MUST COMPLY WITH APPLICABLE
PORTIONS OF THE NATIONAL ELECTRICAL CODE AND/OR OTHER LOCAL ELECTRICAL CODES.
WARNING: DISCONNECT ELECTRICAL POWER SUPPLY AND PLACE A TAG AT THE DISCONNECT
SWITCH, INDICATING THAT THE CIRCUIT IS BEING WORKED ON.
Machines are shipped from the factory with a 6-foot cord and plug. A mating receptacle is furnished
with the machine as standard equipment.
ELECTRICAL DATA
Model V/Hz/Ph
Minimum Circuit Ampacity
Maximum Circuit Breaker Size
AMPS
HCM450
200/60/3 30
230/60/3 30
460/60/3 20
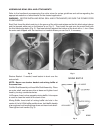
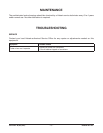
Check Motor Rotation
Check bowl to make sure it is empty, and remove the cut mix
shaft assembly or the knead mix shaft assembly. Close and
latch the lid. Connect the power cord to its receptacle.
Set the timer on JOG. Press START and then release.
The motor should rotate in a clockwise direction as indicated
by the arrow (Fig. 1).
If the motor rotation is incorrect, unplug the power cord,
disassemble the plug and interchange any two of the power
leads (red, white or black). Do not change the green ground
wire. Then reassemble the plug and recheck.
Fig. I