


– 5 –
WARNING: ROTATING KNIFE. USE FEED GRIP. UNPLUG MACHINE POWER CORD BEFORE
CLEANING, SERVICING, OR REMOVING PARTS. REPLACE PARTS BEFORE USE.
SLICING — MODEL 2912B
Loading the Product
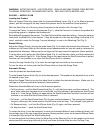
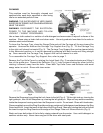
With the Gauge Plate fully closed and the Automatic/Manual Lever (Fig. 2) in the Manual position
(down), pull the carriage all the way toward the operator end of the machine (Home position).
With the Meat Grip out of the way, place the product to be sliced on the Carriage Tray.
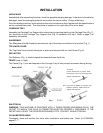
To adjust the Fence: Loosen the thumbscrew (Fig. 1); slide the Fence so it is close to the product but
not pushing against it; retighten the thumbscrew.
Set the Meat Grip against the product. The Meat Grip should be used when slicing. If using the optional
food chute, the Meat Grip is not needed. It may be stored out of the way by sliding it to the top of its
travel, rotating it under the Carriage Tray and allowing it to rest in the Retaining Clip (Fig. 2).
Manual Slicing
Adjust the Gauge Plate by turning the Index Knob (Fig. 2) to obtain the desired slice thickness. The
numbers on the Index Knob do not indicate actual measurements but may be used for reference to
duplicate slice thickness. Make sure the carriage is all the way toward the operator (Home position).
Turn the slicer on by pulling the Start/Pause Knob (Fig. 2) until the slicer starts, and then release the
knob. The Indicator Light is lit. If the Gauge Plate is not open before the Start/Pause Knob is pulled,
the slicer will not continue to run when the Start/Pause Knob is released.
Use the Carriage Handle (Fig. 2) to move the carriage back and forth to slice manually.
To turn the slicer off, either push the Start/Pause Knob or close the Gauge Plate.
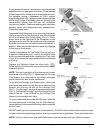
Automatic Slicing
Load the product as described above.
Turn the Speed Selector Knob (Fig. 2) to the desired speed. The speed can be adjusted to any of the
six speeds at any time.
Adjust the Gauge Plate by turning the Index Knob to obtain the desired thickness. Make sure the
carriage is all the way toward the operator (Home position).
Rotate the Automatic/Manual Lever to the Automatic position.
• To Start slicing — pull the Start/Pause Knob (Fig. 2) until the slicer starts, and then release it. The
slicer knife motor and carriage drive unit will start, and the Indicator Light beside the Start/Pause
Knob is lit. If the Gauge Plate is not open before the Start/Pause Knob is pulled, the slicer will not
continue to run when the Start/Pause Knob is released.
• To Pause — pull the Start/Pause Knob (Fig. 2) again, and then release it. The carriage will complete
its cycle, returning to the Home position, and the slicer knife will stop. The Indicator Light goes off.
• To Resume slicing — pull the Start/Pause Knob (Fig. 2) again, and then release it.
• To Stop the slicer — push the Start/Pause Knob.
To restart the slicer, it may be necessary to move the Automatic/Manual Lever to Manual (down), pull
the carriage tray all the way toward the operator (Home position), place the Automatic/Manual Lever
in Automatic (Up) and pull the Start/Pause Knob.
To use the optional food chute, place the Meat Grip on the Retaining Clip, fit the hangers on the food
chute around the meat grip slide rod (at front) and lower the food chute onto the Carriage Tray.