


– 4 –
INSTALLATION
Immediately after unpacking the oven, check for possible shipping damage. If the oven is found
to be damaged after unpacking, save the packaging material and contact the carrier within 15 days
of delivery.
Prior to installation, test the electrical service to assure that it agrees with the specifications on the
machine data plate located on the right side panel near the controls.
HRO550 and HRW330 are secured to the skid with four screws which must be removed.
LOCATION
WARNING: THE OVEN SHOULD NOT BE ACCESSIBLE TO THE CUSTOMER. HOT GLASS AND
PARTS CAN CAUSE BURNS.
The oven may be placed where cooking may be observed to enhance customer awareness. The
oven must be installed on a level surface. A minimum clearance of 10" from the rear, 10" from any
glass, and 4" from each side panel must be maintained. The installation location must allow
adequate clearances for servicing and for proper operation of the front and rear doors.
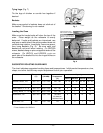
LEGS / CASTERS
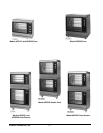
Counter models, HRO101, HRO220 and HRO330, are furnished with 1
1
/2" legs. HRO550,
HRW101, HRW220 and HRW330 are furnished with 2 swivel and 2 locking swivel casters.
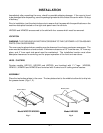
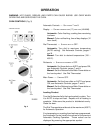
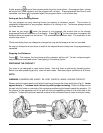
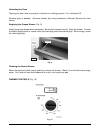
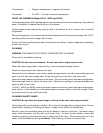
ASSEMBLY
Place the two bottom plates in the oven. The two plates slant to the middle to allow fat to drip into
the grease drawer (Figs.1, 2).
Bottom Plates
PL-50803
Model HRO101
Bottom Plates
PL-50804
Model HRO303
Fig. 1
Fig. 2
Model HRO101/HRO220 Model HRO303