


59
3) Close the icemaker water supply line shut-off valve, then open the icemaker water
supply line drain valve.
4) Allow the line to drain by gravity.
5) Attach a compressed air or carbon dioxide supply to the icemaker water supply line
drain valve.
6)Movethecontrolswitchtothe"ICE"position.
7) Replace the front panel in its correct position, then turn on the power supply.
8) Blow the icemaker water supply line out using the compressed air or carbon dioxide
supply.
9) Close the icemaker water supply line drain valve.
2. Drain the water tank:
1) Turn off the power supply, then remove the front panel. Move the control switch to the
"OFF"position.
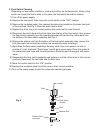
2) Remove the insulation panel. Remove the drain plug located on the lower front part of
theicechute.SeeFig.5.Allowthewatertanktodrain.
3) Replace the drain plug and the insulation panel in their correct positions. Be careful not
to cross thread the drain plug.
4) Remove all ice from the storage bin. Clean the storage bin using a neutral cleaner.
Rinse thoroughly after cleaning.
5) Replace the front panel in its correct position.
3. On water-cooled model, remove the water from the water-cooled condenser:
1) Make sure the power supply is off, then remove the front panel and right side panel.
2) Close the condenser water supply line shut-off valve. If connected to a closed loop
system, also close the condenser return line shut-off valve.
3) Open the condenser water supply line drain valve. If connected to a closed loop system,
also open the condenser return line drain valve.
4) Attach a compressed air or carbon dioxide supply to the condenser water supply line
drain valve.
5) Open the water regulating valve by using a screwdriver to pry up on the spring retainer
underneath the spring. While holding the valve open, blow out the condenser using the
compressed air or carbon dioxide supply until water stops coming out.
6) Close the drain valve(s).