


36
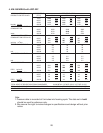
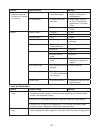
F. Diagnostic Charts
Before consulting the diagnostic charts, check for correct installation, proper voltage per
unitnameplate,andadequatewatersupply.CheckCBusingthestepsin"IV.B.Control
BoardCheck."CheckthedipswitchsettingstoassurethatS4dipswitch3,4,7,8,9,
10, are in the factory default position. S4 dip switch 1, 2, 5, 6 are cleaning adjustments
andthesettingsareexible.Forfactorydefaultsettings,see"II.C.3.a)DefaultDipSwitch
Settings."
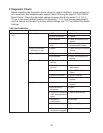
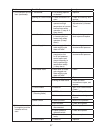
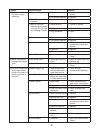
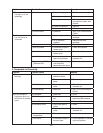
1. No Ice Production
Problem Possible Cause Remedy
[1] The icemaker will not
start.
a)Power Supply 1. OFF position. 1. Move to ON position.
2. Loose connection. 2. Tighten.
3. Bad contacts. 3. Check for continuity and
replace.
4. Voltage too high or too
low.
4. Check and get
recommended voltage.
b)Fuse (Inside fused
disconnect, if any)
1. Blown. 1. Check for short circuit and
replace.
c)Control Switch 1. OFF position. 1. Move to ICE position.
2. Bad contacts. 2. Check for continuity and
replace.
d)Bin Control Thermostat 1. Tripped with bin lled
with ice.
1. Remove ice.
2. Ambient temperature
too cool.
2. Increase ambient
temperature.
3. Set too warm. 3. See"IV.C.BinControl
Check."
4. Bulb out of position. 4. Place in position.
5. Bad contacts. 5. Check for continuity and
replace.
e)High Pressure Control 1. Bad contacts. 1. Check for continuity and
replace.
2. Dirty air lter or
condenser.
2. Clean.
3. Ambient or condenser
water temperature too
warm.
3. Reduce temperature.
4. Refrigerant
overcharged.
4. Recharge.
5. Fan not operating. 5. See chart 1.[6]
6. Refrigerant line or
components plugged.
6. Clean and replace drier.