


The Jackson model AJ-44 series dishmachine has the
ability to have its direction of travel changed from left to right, or
from right to left. Direction of travel is determined by which end the
rack of ware is put into the machine and which end the rack comes
out.
There may come times when it is necessary to change
the direction of travel after the unit is installed. The instructions pro-
vided here are for maintenance personnel only. Unauthorized per-
sons should not attempt any of the steps contained in these
instructions.
Warning: many of the instructions and steps within
this document require the use of tools and may also require
that personnel change the wiring of the machine. Only author-
ized personnel should ever perform any maintenance evolu-
tion on the dishmachine!
PREPARATION
1. Power must be secured to the unit at the service break-
er. Tag or lock out the service breaker to prevent accidental or
unauthorized energizing of the machine.
2. Disconnect incoming water at the water pressure regu-
lator or Y-strainer.
3. Disconnect the service drain line from the drain plumb-
ing of the dishmachine itself. Ensure that the unit is completely
drained before doing this.
4. Remove the locking screw from the control box.
5. Remove the front dress panel.
TOOLS REQUIRED
The following tools will be needed to perform this mainte-
nance evolution:
1. 5/16” nutdriver
2. 7/16” nutdriver
3. 7/16” combination wrench
4. 7/16” socket with drive ratchet and 4” extension
5. 12” pipe wrench
6. 10” adjustable wrench
7. Wire cutters
8. Phillipshead screwdriver
TIME REQUIRED
It is estimated that it will take (1) person three hours to
perform this task, not including all of the items indicated in the sec-
tion entitled “PREPARATION”.
IMPORTANT NOTES
1. Do not lose hardware! Place hardware in a safe spot
away from the machine, ensuring that it does not fall loose into the
machine tub. Hardware that is drawing into the suction of the wash
pump will damage the equipment. If you do need more hardware,
contact Jackson to purchase new items.
2. Read these instructions thoroughly before attempting
this maintenance evolution. Become familiar with the parts and
what actions need to be taken. This will save time in the long run!
STEPS
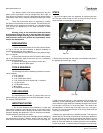
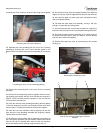
1. Remove the upper wash arm assembly by loosening the spin
nut. The spin nut has a stop so it will not come off. Once it is loos
-
ened, the wash arm assembly should slide off.
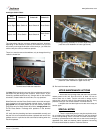
2. Remove the end cap from the wash arm assembly and place in
the opposite end, securing it snugly.
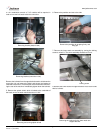
3. With the end cap securely in the opposite end of the wash arm
assembly, set the assembly gently to the side. Go back inside the
unit to where the upper wash arm assembly secured in the unit and
turn the spin nut so that it is all the way down. This needs to be
done because in a further step, if the spin nut is out, it will get in
the way. Do not over-tighten the spin nut as it only needs to be out
of the way, not secured.
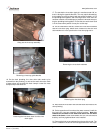
4. Remove the upper wash arm assembly bracket. This step may
require that you have help as the bolts for securing the bracket to
the top of the inner hood are the same bolts that hold the control
box to the hood top. Do not remove the bolts once the nuts are
taken off. Once the bracket is removed, place the nuts immediate
-
ly back on the bolts. To hold the bolts (to keep them from spinning),
www.jacksonmsc.com
AJ-44 Conveyor Direction Change Instructions
Revision A (03/30/2005)
2
Spin nut
End cap