


13
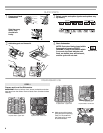
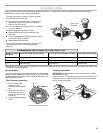
Flexible Tines
The row of tines on the left-hand and
right-hand sides of the top rack can
be adjusted to make room for a
variety of dishes.
To adjust the fold-down tines:
1. Grasp the tip of the tine that is in
the tine holder.
2. Gently push the tine out of the
holder.
3. Lay the tines down toward the
center of the rack.
NOTE: The bottom rack may also have 1 row of flexible tines
located in the back of the rack. Follow the same instructions to
adjust.
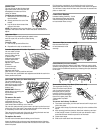
Light Item Clips
The light item clips hold lightweight plastic items
such as cups, lids, or bowls in place during
washing.
To move a clip:
1. Pull the clip up and off the tine.
2. Reposition the clip on another tine.
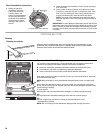
Premium Adjustable 2-Position Top Rack
You can raise or lower
the top rack to fit tall
items in either the top
or bottom rack.
Adjusters are located
on each side of the
top rack. Each
adjuster has 2 preset
positions.
To raise the rack,
press both rack
adjusters and lift the
rack until it is in the Up position and level.
To lower the rack, press both rack adjusters and slide the rack to its
Down position and level.
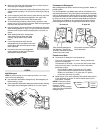
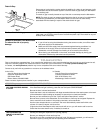
Removable Top Rack (for Ultra Glide rails)
The removable top rack
allows you to wash larger
items such as pots, roasters,
and cookie sheets in the
bottom rack.
IMPORTANT: Remove
dishes prior to removing the
top rack from the
dishwasher.
To remove the rack:
To gain access to the
removable tabs on the
tracks/rails, pull the upper
rack forward about halfway out of the tub.
On one side, press the tab on the track in and pull up the front end
of the rack out of the track. Then repeat this step on the other side
to completely remove the front end of the rack.
Then remove the back end of the rack by pulling the back end out
with a slightly forward then upward motion.
To replace the rack:
Pull the tracks forward about halfway out of the tub.
Along the sides of the racks are round attachment tabs. Align the
rack's back end attachment tabs with the cutout in the track. Push
down into place.
Pull the tracks completely out, and align the rack's front end
attachment tabs with the cutout in the track. Push down into place.
You will hear a snap when the front end of the rack is secured into
place on each side.
Lower-Rack Shelves
Increase loading flexibility - items
like casserole dishes stay stable
while the folding shelf allows you
to load smaller items on top.
Stemware Clips (on some models)
Use the stemware clips
to hold stemware more
securely.
Utensil Basket (on some models)
Use this extra capacity basket in the back of the top rack to hold
spatulas, serving spoons, and similar items. The utensil basket can
be removed for additional capacity by releasing the clips attached
to the rack.
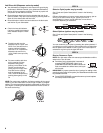
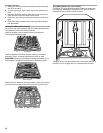
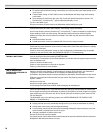
Removable Culinary Tool Rack (Third level rack)
The removable Culinary Tool
Rack (Third level rack) allows
you to wash larger items in
the upper rack, or remove
both the Culinary Tool Rack
and top rack to wash larger
times in the lower rack. See
“Removable Top Rack”
section.
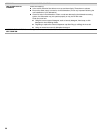
To remove the Culinary Tool Rack:
1. To access track stops, pull the rack forward until it stops and
clicks into place.
2. To open track stops, flip the track stop (A) to the outside of the
track.
3. After opening both track stops, slide front wheels up and out
of the slot (B) in track. Continue to pull rack forward in track
and slide the back wheels up and out of the track.
4. Close track stops.
5. Slide rack tracks back into dishwasher.
A
B