


Important: The grinding grade can only be adjusted while
the grinder is actually grinding.
Attention: Oily beans tend to stick together. Stir beans just
before grinding to ensure a proper flow of beans into the burrs.
9. DAILY PREPARATION
We recommend filling the water container every morning with
fresh, cold water. This will enhance the taste of your coffee.
• Push and hold the On/Off button until the display turns on.
After
WWW.IMPRESSA-F-LINE.COM the display shows
HELLO YOUR MACHINE IS HEATING. After approx. two
minutes the display shows
PRESS MAINT. and the red light in
the Rinse Button (Fig. 3b) will illuminate.
• Press the Rinse Button. Hot water will warm up all internal
parts and pump through the coffee spouts. The water will be
caught in the drawer underneath. The rinse cycle stops by
itself and the display reads:
SELECT PRODUCT. The cup and
bean symbols illuminate. You are now ready to make coffee.
10. GRINDING AND BREWING
The F9 uses a 2-step brewing process (Pre-Brew Aroma System).
This process first moistens the ground coffee (pre-brew phase),
stops for a few seconds and then starts the brewing process.
Please note: After the pre-brew phase you can stop the brewing
process at any time by simply pushing the 1-Cup button. This
will not affect your cup settings.
10a. SELECTING CUP SIZE AND STRENGTH
With the machine in the SELECT PRODUCT mode, you can
choose five cup settings and three different strength settings.
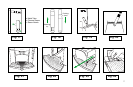
• Adjust the height of the coffee spout to your cup size (Fig. 14)
and place one or two cups underneath the coffee spouts.
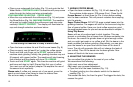
Option One: Touch Screen Controls (Fig. 5)
On the touch screen display you can choose from three cup
sizes and three strength settings, for total of 9 settings:
BIG CUP, COFFEE, ESPRESSO each in MILD, NORMAL or
STRONG.
• Touch the symbols and watch how the display changes.
• Once you have selected your preferred combination, just
touch and hold
ST@RT until grinding begins.
Please see chapter 5 for the amount of coffee brewed for each
of the symbols. To change these cup sizes see chapter 18c.
Please note: You need to touch ST@RT for one second to
activate the grinding/brewing process. This delayed action
prevents the machine from making coffee if somebody
accidentally touches the
ST@RT symbol.
Option Two: 1-Cup and 2-Cup Buttons
In addition to the nine selections on the touch screen you can
also use the 1-Cup and 2-Cup button (Fig. 3c, 3d) to grind and
brew coffee.
Please see chapter 5 for the amount of coffee brewed for these
buttons. To change these cup sizes see chapter 18d.
Please note: The 2-Cup button will automatically brew twice as
much coffee (max. 16oz.) as the 1-Cup button.
11. USING PRE-GROUND COFFEE
You can also use pre-ground coffee, bypassing the grinder. This
comes in handy if someone requests decaf, sugar coated or
flavored coffee.
• Push the Pre-Ground Coffee Button (Fig. 3f). The display shows:
FILL POWDER SELECT PRODUCT.
• Open the lid for the ground coffee funnel (Fig. 1.8) and fill the
funnel with one or two scoops of ground coffee.
13.