


11
16.7 Fill beans
Ⅲ : FILL COFFEE BEANS
Ⅲ Fill with beans as described in Chapter 3.4.
The display FILL COFFEE BEANS goes off after a draw-off
of coffee.
We recommend that you clean the bean container out with a
dry cloth from time to time before filling. For this, switch the
machine off.
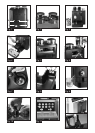
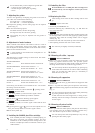
16.8 Removing foreign objects
Ⅲ Switch your machine off with the ON/OFF operating switch.
Ⅲ Remove the plug from the power socket.
Ⅲ Open the hinged door on the reverse of the machine (Fig. 5).
Ⅲ Press the slides downwards (Fig. 6) and remove the bean con-
tainer.
Ⅲ Remove any beans with a vacuum cleaner.
Ⅲ Position the spanner (Fig. 7).
Ⅲ Turn the spanner in an anti-clockwise direction until the foreign
object becomes loose.
Ⅲ Remove remaining powder with a vacuum cleaner.
Ⅲ Now replace the bean container and pull the slides to the front
before closing the door. (Fig. 6).
16.9 Clean machine
Ⅲ : CLEANING NECESSARY
After 220 draw-offs or 180 rinsings, the machine has to be cleaned.
You can continue to draw off coffee and hot water/steam. We re-
commend that you clean the machine (Chapter 19) within the next
few days.
Carry out a cleaning (Chapter 19).
16.10 Machine scaled
Ⅲ : DECALCIFYING NECESSARY
The machine recognises the necessity of de-scaling. You can con-
tinue to draw off coffee or hot water/steam. We recommend that
you carry out the de-scaling (Chapter 20) within the next few days.
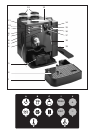
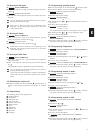
16.11 Clean contacts
Ⅲ : EMPTY DRIP TRAY / CLEAN CONTACTS
The de-scaling residue in the area of the contacts must be removed.
Please proceed as follows:
Ⅲ Rinse the contact fasteners in trough (B) (Fig. 8) as well as the
contacts (A) with hot water and washing-up liquid. Then ad-
ditionally clean the contact fasteners in trough (B) with a brush.
16.12 General cleaning instructions
Ⅲ Never use abrasive articles or corrosive chemicals to clean your
machine.
Ⅲ Wipe off the inside and outside of the casing with a soft, damp
cloth.
Ⅲ Clean the pivoting nozzle after every use.
Ⅲ After heating milk, draw off a little hot water, in order to clean
the pivoting nozzle from the inside.
Ⅲ The water tank must be rinsed and filled with fresh water every
day.
If you see any visible scaling in the water tank, you can
remove it with a customary de-scaling agent.
Remove the water tank in order to clean it.
17. Cappuccino cleaning
Carry out this cleaning every day.
Once the cleaning sequence has started, it must not be interrupted.
It takes about 5 min.
Ⅲ Switch the machine on with the ON/OFF switch.
Ⅲ Press the key until an acoustic signal is heard.
Ⅲ : SELECT
CLEANING
– +
Ⅲ Press the key .
Ⅲ : CAPPUCCINO CLEANING
Ⅲ Press the key again.
Ⅲ : CLEANER FOR CAPPUCCINO /
PRESS CLEANING
Place a vessel of at least 0.5 l under the coffee spout (4).
Ⅲ Put about 25 cl of water into a vessel and add the cleaner. You
can see the amount of cleaner on the label or the sheet accompa-
nying the product in question. Immerse the cappuccino tube into
it.
Ⅲ Press the key .
Ⅲ : CAPPUCCINO CLEANING / PLEASE WAIT
Ⅲ An acoustic signal is heard.
Ⅲ : WATER FOR CAPPUCCINO / PRESS CLEAN
Fill a vessel with fresh water and immerse the cappuccino
tube into it.
Ⅲ Press the key .
Ⅲ : CAPPUCCINO CLEANING / PLEASE WAIT
18. Combined cleaning
Once the cleaning sequence has started, it must not be interrupted.
It takes about 20 min.
Ⅲ Switch the machine on with the ON/OFF switch.
Ⅲ Press the key until an acoustic signal is heard.
Ⅲ : SELECT
CLEANING
– +
Ⅲ Press the key 2x.
Ⅲ : ENTIRE CLEANING
Ⅲ Press the key .
Ⅲ : EMPTY DRAWER / INSERT
TABLET (Fig. 10) /
CLEANER FOR CAPPUCCINO
Ⅲ Place a sufficiently large vessel under the coffee spout .
Ⅲ Put about 25 cl of water into a vessel and add the cleaner. You
can see the amount of cleaner on the label or the sheet accompa-
nying the product in question. Immerse the cappuccino tube into
it.
Ⅲ Press the key .
Ⅲ : ENTIRE CLEANING / PLEASE WAIT
Ⅲ : WATER FOR CAPPUCCINO / PRESS CLEAN
Fill a vessel with fresh water and immerse the cappuccino
tube into it.
Ⅲ Press the key .
Ⅲ : COMBI CLEANING / PLEASE WAIT
Ⅲ : EMPTY DRAWER
+
+
E