


7
Important information for the user
Thank you for choosing this JURA product.
Please study these instructions carefully before using your new ma-
chine and keep them in a safe place for easy reference in the futu-
re.
Should you require further information or should particular pro-
blems occur that are not dealt with in sufficient detail for you in
these operating instructions, then please ask your local dealer for
the information you require or get in touch with us directly.
You will also find useful tips on operation and maintenance
of your IMPRESSA X7 on the website at www.jura.com.
Don’t forget to check out the Knowledge Builder our ani-
mated operating instructions. LEO, our assistant, will take
you through all the functions.
1. Description
The first IMPRESSA for the office and small gastronomy area is
outstanding not only because of its modern technology, but also a
number of features, and prepares 1 or 2 cups of espresso/coffee in
only one brewing process. The intelligent pre-brew aroma system
(I.P.B.A.S.
©
) ensures that the full coffee aroma is made use of and
supplies the best espresso/coffee, guaranteed to be covered by a
splendid froth. Optionally, coffee can be used from either of the
grinders, and the mixture can be programmed individually. Draw-
ing-off cappuccino is possible at the push of a button and without
moving the cups. Integrated rinsing, cleaning and de-scaling pro-
grammes ensure perfect cleanliness at the push of a button.
2. Safety instructions
2.1 Warnings
Ⅲ Children are unaware of the dangers that can be caused by
electrical machines; for this reason, children should never be left
unsupervised with electrical machines.
Ⅲ The machine may only be used by people who have been
instructed.
Ⅲ Never use a faulty machine or one with a damaged power cable.
Ⅲ Never immerse the machine in water.
2.2 Safety precautions
Ⅲ Never expose the machine to the effects of weather (rain, snow,
frost) and never operate it with your hands wet.
Ⅲ Place the IMPRESSA on a firm, level base that is resistant to
any water that may leak. Never stand on hot or warm surfaces
(oven hobs). Keep out of the reach of children.
Ⅲ Remove the plug from the power socket if you are away for
some time (holidays etc.).
Ⅲ Always remove the plug from the power socket before cleaning.
Ⅲ When removing the plug from the power socket, never tug on
the cord or the machine itself.
Ⅲ Never repair or open the machine yourself. Repairs may only be
done by authorised service centres using original spare parts and
accessories.
Ⅲ The machine is connected to the mains power socket via an
electric cable. Please ensure that no-one trips over the cable and
pulls the machine down. Keep children and pets at a distance.
Ⅲ Never put the machine or parts of it into the dishwasher.
Ⅲ To prevent overheating, please put the machine in a place with a
good circulation of air.
Ⅲ If you use de-scaling agents containing acid, remove any
splashes and drips on sensitive surfaces, in particular natural
stone and wood surfaces, straight away or take corresponding
safety precautions.
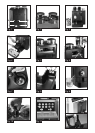
3. Preparing the machine
3.1 Checking the mains voltage
The machine has been set to the correct mains voltage in the
factory. Ensure that your mains voltage corresponds to the details
on the rating plate attached to the reverse of your machine
(Fig. 1/A).
3.2 Checking the fuse
Check whether the fuse matches your machine.
3.3 Filling the water tank
Ⅲ Remove the water tank and rinse it out well with cold tap water.
Ⅲ Then fill the water tank and put it back into the machine. Please
ensure that the tank locks in properly .
Please only use fresh, cold water. Never fill up with milk,
mineral water and other fluids. You can also top up water
without removing the tank. Simply remove the cover and
pour in the water from above with a vessel and replace the
lid again.
3.4 Adding coffee beans
You have the possibility of adding two different sorts of coffee
beans.
Ⅲ Remove the cover from the bean container.
Ⅲ Clean out any dirt or foreign objects from the bean container.
Ⅲ Fill coffee beans into the bean container and replace the cover
again.
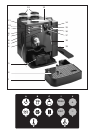
4. Switching the machine on
Ⅲ Operate the switch on the reverse of the machine (Fig. 1/II).
Ⅲ Switch the machine on with the ON/OFF operating switch.
Ⅲ : PLEASE WAIT
Ⅲ Place an empty cup under the coffee spout (4).
Ⅲ : RINSE UNIT
The rinsing is done first via the cappuccino nozzle, after
which the coffee spout is cleaned..
5. Rinsing the machine
A rinsing process is automatically started when the machine is
switched off.
However, if no cappuccino has been drawn off, the rinsing is only
done via the coffee spout when switching off. When the machine
has been switched off and has cooled down, the rinsing process is
requested when it is switched on again.
6. Selecting the grinder
You can select the grinder manually
Ⅲ Press the key 1x or 2x. The light above the key tells you
which grinder has been activated (grinder left or grinder right).
6.1 Setting the grinder
So that the coffee can be matched to the grinder as well as possi-
ble, carry out the following steps:
Ⅲ Press the key
Ⅲ Draw off 6 coffee and 6 espresso by manually selecting the
grinder “left” and then the grinder “right”.
E