


2
before using for the first time
1
Read these instructions carefully and retain for future reference.
2
Remove all packaging and any labels.
3 Wash the parts: see ‘cleaning’.
4
Flush the machine through with clean water: see ‘before making coffee for the
f
irst time’.
safety
● Never remove the filter holder whilst coffee is brewing or steam is being
p
roduced - steam could shoot out and burn you.
● D
on’t get burnt by:
●●
hot parts, including the steam nozzle, filter holder and coffee outlet.
●●
s
team coming out of the steam nozzle or coffee from the coffee outlet.
● K
eep children away from the machine. And never let the cord hang down
where a child could grab it.
● N
ever use a damaged machine. Get it checked or repaired: see ‘service and
c
ustomer care’.
● Never put the machine in water or let the cord or plug get wet - you could get
a
n electric shock.
● U
nplug:
●
●
before filling with water
●●
b
efore cleaning
●●
a
fter use.
● Never leave the machine on unattended.
● Don’t let the cord touch hot parts.
●
This appliance is not intended for use by persons (including children) with
r
educed physical, sensory or mental capabilities, or lack of experience and
knowledge, unless they have been given supervision or instruction concerning
use of the appliance by a person responsible for their safety.
●
Children should be supervised to ensure that they do not play with the
appliance.
●
Only use the appliance for its intended domestic use. Kenwood will not accept
any liability if the appliance is subject to improper use, or failure to comply with
these instructions.
important
● Never use without water - the pump will burn out.
● Keep the machine above 0°C - otherwise any water in the machine will freeze
and cause damage.
● Never use without the drip tray and cup stand.
before plugging in
● Make sure your electricity supply is the same as the one shown on the
underside of your machine.
Important – UK only
●
The wires in the cord are coloured as follows:
Green and Yellow = Earth,
Blue = Neutral,
Brown = Live.
●
The appliance must be protected by a 13A approved (BS1362) fuse.
●
WARNING: THIS APPLIANCE MUST BE EARTHED.
Note:
●
For non-rewireable plugs the fuse cover MUST be refitted when replacing the
fuse. If the fuse cover is lost then the plug must not be used until a replacement
can be obtained. The correct fuse cover is identified by colour and a
replacement may be obtained from your Kenwood Authorised Repairer (see
Service).
●
If a non-rewireable plug is cut off it must be DESTROYED IMMEDIATELY. An
electric shock hazard may arise if an unwanted non-rewireable plug is
inadvertently inserted into a 13A socket outlet.
●
This appliance conforms to EC directive 2004/108/EC on Electromagnetic
Compatibility and EC regulation no. 1935/2004 of 27/10/2004 on materials
intended for contact with food.
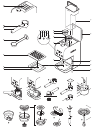
know your Kenwood espresso machine
ቢ
removable water tank
ባ
lid
ቤ finger grip for steam nozzle
ብ
steam tube
ቦ
steam nozzle
ቧ coffee outlet
ቨ
variable steam knob
ቩ
small filter for 1 cup dispensing or coffee pod
ቪ tab
ቫ
large filter for 2 cup dispensing only
ቭ
coffee button
ቮ coffee ready indicator light
ቯ on/off button
ተ
steam ready indicator light
ቱ steam button
ቲ drip tray
ታ
float
ቴ cup stand
ት measuring spoon/coffee tamper
ቶ
filter holder
filter emptying lever
cup storage tray
before making coffee for the first time
1
Make sure the variable steam knob is closed by turning clockwise (don’t
overtighten).
2 Lift the lid, then lift out the tank and fill with cold water. Never fill above the
“MAX” level marked. Alternatively lift the lid and fill the tank whilst in position.
● We recommend using filtered water as it produces better coffee and reduces
limescale. Never use fizzy water or any other liquid.
3 Re fit the tank. Make sure that it is correctly located and apply light pressure if
necessary to ensure the valve at the bottom of the tank connects with the
bottom of the machine.
Important
Never operate the machine without water in the tank. Top up as
soon as the level gets low.
4 Close the lid.
5 Hold the finger grip and swing out the steam nozzle and put a jug underneath.
6 Attach the filter holder to the machine by positioning it under the coffee outlet
and turning to the right ᕡ. Place a suitably sized container underneath.
7 Connect to the power supply then press the on/off button and it will glow
orange. At the same time the green coffee ready indicator light will flash. Wait
until the green light stops flashing.
8 Open the variable steam knob by turning anti-clockwise and press the coffee
button and allow one cup of water to flow out of the steam nozzle. Close the
variable steam knob and allow one cup of water to flow out of the coffee outlet
into the container.
9 Press the coffee button to stop the flow, then press the on/off button to switch
off the machine.
10 Repeat these steps if you haven’t used the coffee maker for a few days.
preheating the coffee machine
To ensure your espresso coffee is dispensed at the right temperature it is
necessary to pre-heat the coffee unit.
1 Check that the variable steam knob is firmly closed (turn clockwise) and that
there is sufficient water to heat 1 or 2 cups as required.
2 Fit the desired filter into the filter holder (without coffee and making sure that the
tab on the filter fits into the slot on the filter holder). Attach to the machine by
positioning it under the coffee outlet and turning to the right ᕡ. Ensure it is
firmly located.
3 Position a cup under the filter holder. Using the same cup that the coffee will be
served in will ensure it is preheated.
4 Press the on/off button and it will glow orange. At the same time the green
coffee ready indicator light will flash. Wait until the green light stops flashing.
5 Press the coffee button and it will glow orange, and hot water will dispense into
the cup. When the green coffee ready light starts flashing again, press the
coffee button to stop the flow.
6 Remove the filter holder and proceed to make coffee using either ground coffee
or coffee pods.