


3
to make espresso using ground coffee
1 Pre heat the appliance as described on page 2.
2
Check that there is water in the tank.
3
Select the desired filter.
● Use the smaller filter for making one cup of coffee (or when using coffee pods)
a
nd the larger filter for 2 cups.
4
Add the coffee using the measuring spoon provided one level spoon per cup,
level the surface then lightly press with the coffee tamper. Wipe off any coffee
around the rim.
● W
hen buying ground coffee make sure it is suitable for espresso machines.
● Never press the coffee too firmly as it will block the filter and the coffee will
come out very slowly and the crema will be of a dark colour. However, if it is
p
ressed too lightly, the coffee will come out too fast and the crema will be a
light colour and the coffee will taste watery.
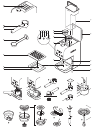
5 Fit the filter holder. Make sure that the tab on the filter fits into the slot on the
f
ilter holder.
6 Fit the filter holder into the coffee outlet. Turn it to the right to lock into position
ᕡ.
● P
ut one or two cups underneath ᕢ. If making one cup of coffee, centre your
cup in the middle.
7 Press the on/off button and wait until the green coffee ready indicator light
s
tops flashing, then press the coffee button.
8 When you’ve enough coffee – not too much otherwise it will be too weak, press
the coffee button. If you’re not making more coffee press the on/off button to
s
witch off the machine. The chart below gives a guide on how long to operate
the coffee button to produce drinks of different volumes.
9 Wait for 30 seconds then remove the filter holder by turning to the left.
● There may be water on the filter when you remove it: this is normal
10 To remove the used coffee from the filter holder, flip the lever on the handle so
that the end locates over the filter ᕣ. Hold the lever in position then tip the unit
upside down and tap out the grounds ᕤ.
Important
Never remove the filter holder while the coffee or steam function
is selected – steam could shoot out and burn you.
to make coffee using filter pods
Important
If the filter for one cup is used after ground coffee has been used, it is
necessary to clear any ground coffee from around the coffee outlet. This is
necessary to avoid water leakages from the filter holder and to ensure optimum
performance. Take care as the area may be hot.
1 Pre heat the machine as described on page 2, fitting the small filter in the filter
holder.
2 After pre-heating remove the filter holder and place the coffee pod into the filter
making sure the pod is facing the correct way ᕥ.
3 Press the pod towards the lower part of the filter, making sure that the paper
flaps adhere to the inner part of the filter.
4 The pod needs to be well centred and placed firmly in the filter.
5 Fit the filter holder into the coffee outlet and turn to the right until it locks into
position ᕡ.
6 Follow the points ‘to make espresso’.
Note – use pods that conform to the ESE standard.
● Always follow the instructions on the package of the
pods for the correct positioning of the pods in the filter
to froth milk for cappuccino
Prepare the espresso as previously described
hint - to prepare more than one cappuccino, first make all the coffees then at
the end prepare the frothed milk for all the cappuccinos.
1 Make sure there is water in the tank.
2 Ensure that the variable steam control is closed.
3 Press the on/off button and it will glow orange.
4 Press the steam button and the red steam indicator light will flash.
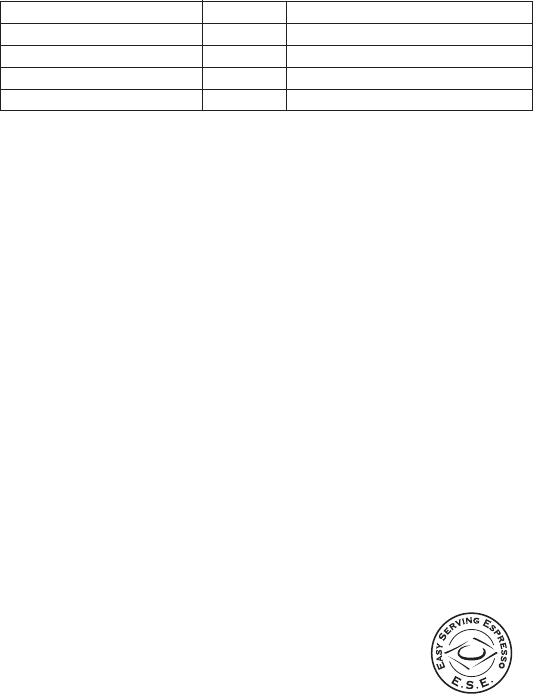
q
uantity filter size approximate time to dispense
1 Espresso (40ml) 1 cup 12 sec
2 x Espresso (40ml each) 2 cup 25 sec
1 large coffee (125ml) 1 cup 32 sec
2 large coffees (125ml each) 2 cup 65 sec
5 Wait until the red light glows continuously indicating that the unit has reached
t
he correct temperature.
6
Part fill a jug with milk – the milk may increase up to three times in volume so
select a suitably sized jug. As a guide use 40-60 ml milk per cappuccino.
● C
old semi skimmed milk gives the best results.
7
Hold the jug in one hand and place the nozzle in the milk, ensure that the milk
does not go above the join in the nozzle.
8
Open the variable steam knob by turning in an anti clockwise direction. The
m
ilk will begin to increase in volume and become frothy ᕦ. Adjust the height of
the jug ensuring that the tip of the nozzle remains below the surface of the milk.
A
fter 20-25 seconds the milk will be steamed and frothy.
9
Stop the steam by turning the varialble steam knob in a clockwise direction.
● Never allow the milk to boil as this will spoil the flavour of the coffee.
1
0 Press the steam button.
1
1 Pour the frothed milk into the cups containing the espresso coffee. For coffee
latte hold back the froth and just add the steamed milk.
I
mportant – Never operate the steam nozzle for longer than 2 minutes at one
t
ime, and always clean the nozzle after use.
12 Press the on/off button to switch off.
to make espresso after frothing milk
I
mportant
N
ever remove the filter holder from its housing immediately after using the
steam fuction.
I
f you’re making espresso after frothing milk, you need to get rid of any over-hot
water that could burn your coffee. Here’s how:-
1 Switch off the steam button.
2
Ensure there is water in the tank and place a jug beneath the steam nozzle.
3 Open the variable steam knob by turning anti-clockwise and press the coffee
button (water/steam will come out of the steam nozzle). Wait until the green
light flashes then close the variable steam knob and switch off the coffee
button
4 Wait for additional time until the green light glows continuously. When this
happens the machine is ready to make coffee.
cleaning
steam nozzle
Prior to cleaning the steam nozzle allow some hot water to flow out of the
nozzle to assist with the cleaning operation. This should be carried out
immediately after having dispensed steam. Here’s how:-
1 Ensure there is water in the tank and that there is a jug under the steam nozzle.
2 Switch off the steam button.
3 Open the steam knob by turning in an anti-clockwise direction.
4 Press the coffee button and operate for approximately 10 seconds to allow hot
water to pass through the nozzle.
5 Switch off the coffee button then close the variable steam knob by turning
clockwise.
6 Press the on/off button to switch off the machine.
● Before further cleaning, unplug and let everything cool.
● Never immerse the appliance in water.
● Don’t wash parts in the dishwasher.
steam nozzle
1 Unscrew the nozzle by turning clockwise, then wash thoroughly. Check that the
3 holes indicated are not blocked Ƹ. If necessary unblock them with a pin.
2 Clean the steam tube. Make sure the end is not blocked.
3 Screw the nozzle back onto the delivery tube.
tank, lid, filter holder
● Wash, rinse and allow to dry.
filter (one and two cup version)
● Wash and dry after every use.
● After approximately every 100 uses dismantle and clean more thoroughly as
described below.
● Remove the cap located on the underside of the filter by turning in the direction
indicated ᕧ. Remove the crema device by pushing up from the underside ᕨ.
Separate the components of the crema device by pulling the gasket to the side
ᕩ and removing the plastic disc and metal filter µ. Rinse parts thoroughly.
Clean the metal filter in hot water using a brush ¸. Make sure the holes in the
metal filter are not blocked. If necessary clean with a pin ¹. Dry the parts then
reassemble, making sure the parts are correctly assembled.