


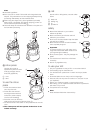


d
ough tool
●
Place the dry ingredients in the bowl and add the liquid down the
feed tube whilst the machine is running. Process until a smooth
e
lastic ball of dough is formed this will take 60 - 90 secs.
●
Re-knead by hand only. Re-kneading in the bowl is not
recommended as it may cause the processor to become
u
nstable.
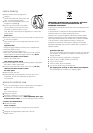
ቴ twin beater geared whisk
U
se for light mixtures only eg egg whites,
cream, evaporated milk and for whisking
eggs and sugar for fatless sponges.
H
eavier mixtures such as fat and flour will
damage it.
using the whisk
1 Fit the drive shaft and bowl onto the
power unit.
2 Push each beater securely into the drive
head .
3 Fit the whisk by carefully turning until it
drops over the drive shaft.
4 Add the ingredients.
5 Fit the lid - ensuring the end of the shaft locates into the centre
of the lid.
6 Switch on.
hints
●
Best results are obtained when the eggs are at room
temperature.
●
Ensure the bowl and whisks are clean and free from grease
before whisking.
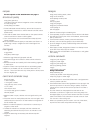
ት maxi-blend canopy
When blending liquids, use the maxi-
blend canopy with the knife blade. It
allows you to increase the liquid
processing capacity from 1 litre to 1.5
litres, prevents leaking and improves the
chopping performance of the blade.
1 Fit the drive shaft and bowl onto the
power unit.
2 Fit the knife blade.
3 Add ingredients to be processed.
4 Fit the canopy over the top of the blade
ensuring it sits on the ledge inside the
bowl . Do not push down on the
canopy, hold by the centre grip.
5 Fit the lid and switch on.
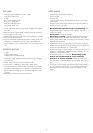
slicing/shredding discs
r
eversible slicing/shredding discs
- thick ቶ, thin k
U
se the shredding side for cheese,
c
arrots, potatoes and foods of a similar
texture.
U
se the slicing side for cheese, carrots,
p
otatoes, cabbage, cucumber, courgette,
beetroot and onions.
Parmesan disc k
G
rates Parmesan cheese.
safety
●
N
ever remove the lid until the
c
utting disc has completely
stopped.
●
Handle the cutting discs with care
- they are extremely sharp
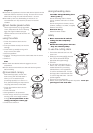
to use the cutting discs
1 Fit the drive shaft and bowl onto the
power unit.
2 Holding by the centre grip , place the
disc onto the drive shaft with the
appropriate side uppermost .
3 Fit the lid.
4 Choose which size feed tube you
want to use. The pusher contains a
smaller feed tube for processing
individual items or thin ingredients.
To use the small feed tube - first put
the large pusher inside the feed tube.
To use the large feed tube - use both
pushers together.
5 Put the food in the feed tube.
6 Switch on and push down evenly with the pusher - never put
your fingers in the feed tube.
4
ቴ
k
b
k
b
ት
P
8
1
2
3
4
5
6
7
0
k
c
k
c
21
22
k
20
k
22
k
21
0
P
00
8
1
2
3
4
5
6
7
k
d
k
e
k
d
k
e