


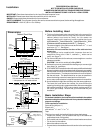


4
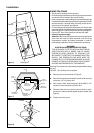
Rearside of the Cabinet***
max
13
3
/
16
" *
min 10
13
/
16
" *
* Do not consider the Door of the Cabinet
** Add
4
/
16
"
when using Spacers
CUT-OUT
7
1
/
2
"
*** Rearside of the Cut-Out for cabinet deeper
than
13
3
/
16
" (without considering the door)
C
L
Cabinet
Door
22
1
/
16
" (24" Model)**
28
7
/
16
" (30" Model)**
34
7
/
16
" (36" Model)**
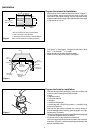
Installation
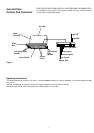
Figure 4
Figure 5
Prepare the cabinet for installation
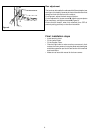
• Mark and cut-out the cabinet bottom as shown in figure 3.
• Fit the template, which comes with the hood, on the inner
right side of the cabinet making sure the side with arrows
matches with the lower edge of the cabinet and the rear edge
of the cabinet or cut-out.
• Drill 2 holes
5
/
64
” (see figure 4 - fixing point 1 and 2) and 1 blind
hole
15
/
64
” in diameter,
13
/
64
” in depth.
• Move template to the other side and repeat.
• Make cut-out for duct and conduit, see figure 1.
Prepare the hood for installation
• Remove the hood from packaging, check its condition and
make sure the following pieces are included:
1 hood,
1 registration card
1 instruction manual
1 template
1 transition with damper
1 plastic bag with 4 hood fixing screws + 1 transition fixing
screw and 4 spacers.
• Remove the light shield, unscrew and remove lamps to
prevent damage when installing (see paragraph on “Light
replacement” for details).
• Pull out the slider and remove the grease filters (see paragraph
“To remove the grease filters” for details).
• Fit the transition on the outlet hole of the hood:
This has a bayonet lock and must be fixed to the hood with
one screw (Figure 5), check the opening and closing of the
damper mounted inside.
Figure 3
Bottom of
the cabinet
Backside of
the cabinet
Backside
border
cutout for
1/2" Conduit
and 5" Duct
Blind hole
(Side Springs
Housing)
Fixing
point 1-2
Fixing
point 1-2
Cabinet
Door
Template
Template