


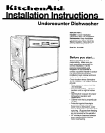

Now start...
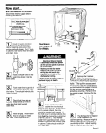
with dishwasher in kitchen.
Disconnect electric supply before
installing dishwasher.
\
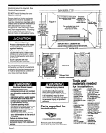
Cut 1” holes for water,drain’
and electrical lines within
shaded area.
Thd unshaded area must
be free of pipes,
drain hose or wires.
‘“\I
II
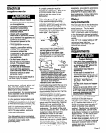
Rough in water and drain
m lines to the dishwasher
cabinet opening using one of the
routing methods shown. Cut 1” hole
in cabinet, rear wall or floor for water
and drain lines.
12
n
1
I
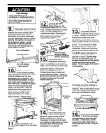
Install a shutoff valve in the
water line where it can be
easily used.
13
W
Flush water line to get rid of
any particles that may clog
inlet valve. Tbrn shutoff valve-to the
“OFF” position.
14
Check that there are no
n
sharp bends or kinks in
water line that might restrict
water flow.
Install air gap. Attach drain
hose to air gap or waste
tee. See “Drain requirements”,
Numbers
correspond 13.
to steps.
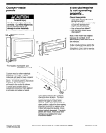
Electrical Shock Hazard
l
Disconnect electrical power
at the service panel (fuse box
or circuit box).
l
Make sure that the water
supply line, drain line and
wiring do not touch any
exposed terminals of the
dishwasher wiring.
Failure to do so could result in
serious Injury or death.
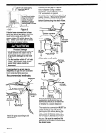
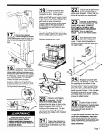
Cut a 1 inch hole in the
cabinet for the electrical
wiring to pass through. If this hole is
cut in a wood cabinet, the hole
should be sanded until smooth. If
the hole is cut in a metal cabinet, the
hole must be covered by a grommet
(Pan No. 302797). Run flexible
cable from fused disconnect, circuit
breaker or junction box through hole
in cabinet. Cable should extend 24”
from back wall.
8.
lv
18.
A&?-l
-,
lu-
Remove the 2 screws
n
below the access panel.
Press up on tabs and pull out bottom
of access panel to unhook tabs from
frame. Then pull the access panel
downward to slide the panel flanges
out from behind the support channel.
Set the access panel aside on a
protective covering. Remove the 2
toe-panel screws. Remove the toe
panel.
I I
/8
n
The dishwasher is shipped
to be installed in 34”
cabinet opening. Measure height of
cabinet opening from underside of
countertop to floor. Adjust leveling
legs to required opening height.
Page 5