


English
12
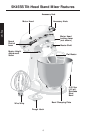
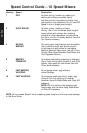
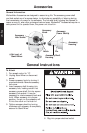
Your Stand Mixer is adjusted at the factory so the flat beater just clears the bottom of
the bowl. If, for any reason, the flat beater hits the bottom of the bowl or is too far
away from the bowl, you can correct clearance easily.
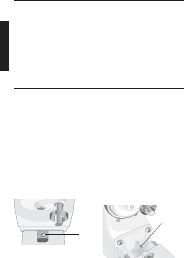
Beater to Bowl Clearance
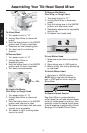
Tilt Head Stand Mixers:
1. Turn speed control to “O”.
2. Unplug Stand Mixer.
3. Lift motor head.
4. Turn screw (A) SLIGHTLY counter
clockwise (left) to raise flat beater or
clockwise (right) to lower flat beater.
5. Make adjustment with flat beater, so it
just clears surface of bowl. If you over
adjust the screw, the bowl lock lever
may not lock into place.
NOTE: When properly adjusted, the flat
beater will not strike on the bottom or
side of the bowl. If the flat beater or the
wire whip is so close that it strikes the
bottom of the bowl, coating may wear off
the beater or wires on whip may wear.
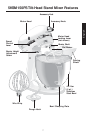
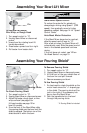
Bowl-Lift Stand Mixers:
1. Turn speed control to “O”.
2. Unplug Stand Mixer.
3. Place bowl-lift handle in down
position.
4. Attach flat beater.
5. Turn screw (B) SLIGHTLY counter
clockwise (left) to raise flat beater or
clockwise (right) to lower flat beater.
6. Place bowl-lift handle in up position to
check clearance.
7. Repeat steps 5 and 6 if necessary.
NOTE: When properly adjusted, the flat
beater will not strike on the bottom or
side of the bowl. If the flat beater or the
wire whip is so close that it strikes the
bottom of the bowl, coating may wear off
the beater or wires on whip may wear.
A
B
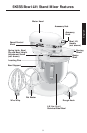
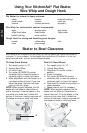
Using Your KitchenAid
®
Flat Beater,
Wire Whip and Dough Hook
Flat Beater for normal to heavy mixtures:
cakes biscuits creamed frostings
quick breads candies meat loaf
cookies mashed potatoes pie pastry
Wire Whip for mixtures that need air incorporated:
eggs sponge cakes egg whites
angel food cakes heavy cream mayonnaise
boiled frostings some candies
Dough Hook for mixing and kneading yeast doughs:
breads coffee cakes rolls
buns pizza dough