


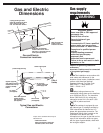

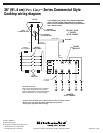
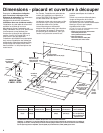

7
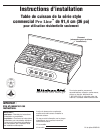
Installation
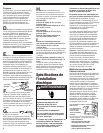
Excessive Weight Hazard
Use two or more people to move
and install cooktop.
Failure to do so can result in back
or other injury.
WARNING
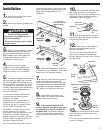
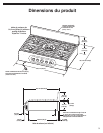
1.Remove the top wood sheet from
over the top of the cooktop.
7.Carefully lift and place the cooktop
into the front area of the cutout. Be
careful not to pinch the power supply cord
or damage the pressure regulator/flexible
gas supply line connector if installed. DO
NOT place all the way back into cutout.
4.Unpack the burner grates,
Instawok, burner caps, regulator and
island trim. Items are either packaged
under the cooktop or on the cooktop.
5. The pressure regulator and flexible,
stainless steel gas supply line connector
can be assembled to the cooktop now or
after the cooktop is installed in the cutout.
To assemble now, stand the cooktop on
its side or back surface and complete this
part of the pressure regulator/gas line
connector assembly.
To connect the flexible, stainless steel
connector to the pressure regulator
requires a 1/2" nipple.
Install the pressure regulator with the
arrow pointing up toward the bottom of
the burner box and in a position where
you can reach the regulator cap.
IMPORTANT: All connections must be
wrench-tightened. Do not make
connections to the gas regulator too tight.
Making the connection too tight may
crack the regulator and cause a gas leak.
Do not allow the regulator to turn on the
pipe when tightening fittings.
Use only pipe-joint compound made for
6.Attach the backguard or island trim
as required for your installation. Attachment
screws are in the literature package.
8.Place cooktop completely into
cutout. Note: The cooktop must be level
for best cooking performance.
9.
If the pressure regulator and
flexible, stainless steel gas supply were
not assembled in Step 5, complete the
assembly now. The pressure regulator
MUST be installed with arrow on the
regulator pointing up toward the burner
box.
10 . Connect flexible, stainless steel
gas supply connector to the rigid gas
supply line. Do not kink the connector.You
will need to determine fittings required
depending on your installation.
11. Open shutoff valve in the gas
supply line. Wait a few minutes for gas to
move through the gas line.
to cooktop
shutoff valve
“open” position
attaching the
backguard
gas supply
line
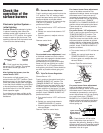
13. Put burner caps on each burner
base. Place burner grates over burner
bases and caps.
Go to "Check the operation of the surface
burners" on Page 8.
12.Leak testing of the appliance
shall be conducted according to the
following instructions:
Test all connections by brushing on an
approved non-corrosive leak-detection
solution. Bubbles will show a leak. Correct
any leak found.
burner cap
burner
base
ignitor
electrode
gas tube
opening
internal
burner cap
external
burner cap
burner
base
ignitor
electrode
gas tube
opening
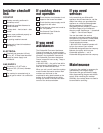
attaching the
island trim
center hole
not used
2.Remove the shipping brackets and
discard.
3.Carefully lift the cooktop up and set
aside. Write down the model and serial
numbers before installing the cooktop.
Both numbers are on the model/serial
number plate located on left front
underside of the burner box.
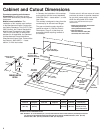
3 front screws
(3 rear screws required
but not shown)
2 screws
use with Natural and L.P. gas. Do not use
teflon tape.You will need to determine the
fittings required depending on your
installation.
TripleTier™ Flame burner caps