


15
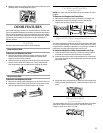
Shelves and Shelf Frames
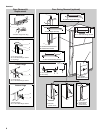
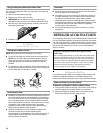
To Remove and Replace a Shelf/Frame:
1. Remove the shelf/frame by tilting it up at the front and lifting it
out of the shelf supports.
2. Replace the shelf/frame by guiding the rear shelf hooks into
the shelf supports. Tilt the front of the shelf up until rear shelf
hooks drop into the shelf supports. Check to make sure that
the shelf is securely in position.
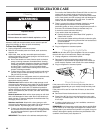
Crispers and Meat Drawers
(on some models)
Drawers
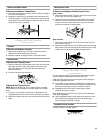
To Remove and Replace a Drawer:
1. Slide drawer straight out to the stop. Lift the front of the
drawer and slide it out the rest of the way.
2. Replace a drawer by sliding it back in fully past the stop.
Crisper Cover
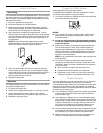
To Remove the Crisper(s) Cover:
1. Remove crisper(s). Hold the glass insert firmly with one hand
and press up in the center of the glass insert until it rises
above the plastic frame. Carefully slide the glass insert
forward to remove.
2. Lift the cover frame and remove it.
To Replace the Crisper(s) Cover:
NOTE: Before reinstalling the cover, make sure the U-shaped
reinforcement bar is reinstalled in the front edge of the crisper
cover.
1. Fit back of cover frame into supports on side walls of the
refrigerator and lower the front of the cover frame into place.
2. Slide rear of glass insert into cover frame and lower front into
place.
Meat Drawer Cover
To Remove and Replace the Meat Drawer Cover:
Style 1–Glass
1. Remove the meat drawer. Tilt up the front of the cover and lift
at the back. Pull the cover straight out.
2. Replace the cover by guiding the rear hooks into the shelf
supports. Tilt the cover up at the front until the rear hooks
drop into the slots. Lower the front of the cover to a level
position and replace the meat drawer.
Style 2–Plastic
1. Remove the meat drawer. Tilt the cover up at the front and
pull it forward and out.
2. Replace the meat drawer cover by fitting the notches and rear
edge of the cover over rear and center crossbars on the shelf.
Lower cover into place and replace the meat drawer.
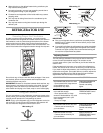
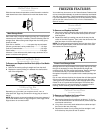
Crisper Humidity Control
(on some models)
You can adjust the amount of humidity in the moisture-sealed
crisper using the settings between HIGH and LOW.
LOW (open) lets moist air out of the crisper for best storage of
fruits and vegetables with skins.
■ Fruit: Wash, let dry and store in refrigerator in plastic bag in
crisper. Do not wash or hull berries until they are ready to use.
Sort and keep berries in original container in crisper.
■ Vegetables with skins: Place in plastic bag or plastic
container and store in crisper.
HIGH (closed) keeps moist air in the crisper for best storage of
fresh, leafy vegetables.
■ Leafy vegetables: Wash in cold water, drain and trim or tear
off bruised and discolored areas. Place in plastic bag or
plastic container and store in crisper.
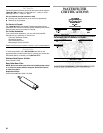
Humidity Control Location
Humidity Control on crisper drawer